
Some details on Germination; before and after
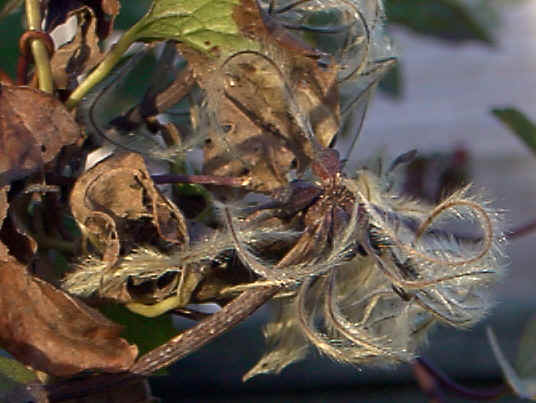
C. napaulensis greets the World
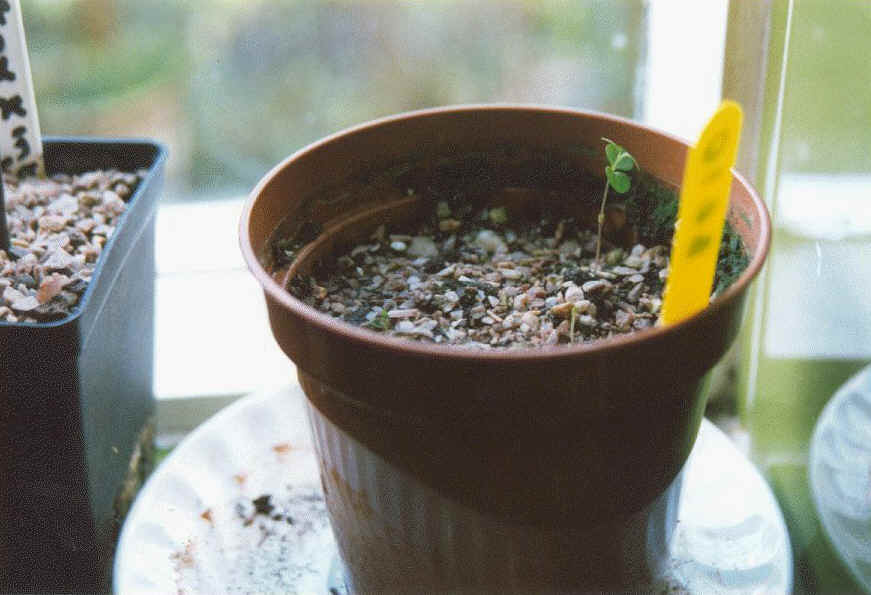
LFH seedlings - there are three; one easily visible and one newly-emerged (in front of the other). The third (tiny) seedling is just to the left - difficult to photograph!
Note - LFH = large-flowered hybrid
Some important points:
There are more photos of germinating
seedlings on the
growth gallery page.
There is a
table of information
on the time taken for various clematis seeds to germinate at the bottom of this page.
Immediately following the next paragraph
Setting the scene for the contents of this page.
(Immediately next is a repeat of three or four paragraphs from the Overview page of the site, because the information is fundamental).
The appropriate books show that the clematis family is very large, and diverse in many aspects: however, to the seed grower, that's no inhibition, because the seeds of all clematis happen to fall into more-or-less two general groups:
Two types of clematis seeds; those which germinate fairly quickly, and those that take some more time.
Many clematis species, and virtually all
large-flowered hybrid seeds, will take some time to germinate. Therefore,
you must expect a �lead-time� between when you sow, and when you expect your
first germinations. Click here: germination
data table (it is further down this page).
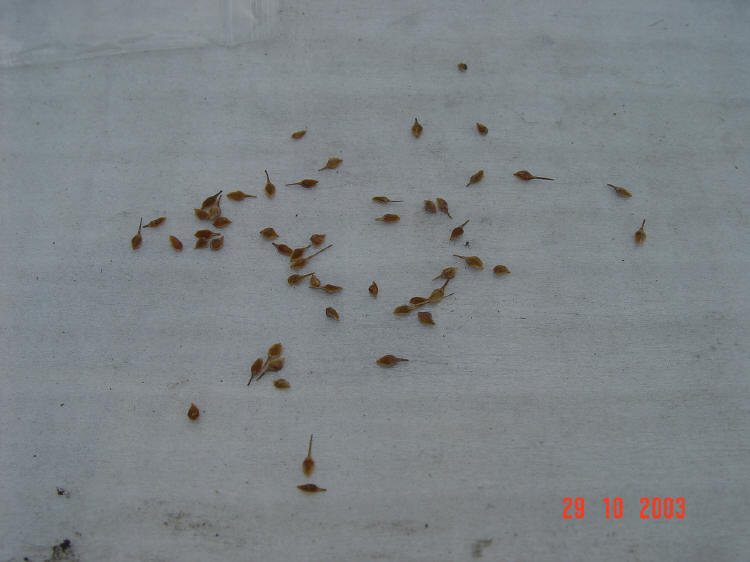
Mature large-flowered hybrid seeds
However, there are many types of clematis seed
which will germinate much more quickly, for example, C. serratifolia, a
magnificent plant which will germinate, grow and flower usually all within the
first season, going on to develop into a fine and floriferous plant in
subsequent years, even for the first-time raiser. Another example is C.
tangutica - in fact, many of the �orientalis� (meclatis) group and their
cultivars (mostly smaller, yellow flowers) will germinate, and grow-on, quickly.
Many of the �atragene� group � the alpinas and macropetalas, and others,
produce seed which also will germinate fairly easily and quickly. Most of these
plants produce much smaller, thinner-walled seeds, which are not meant to
withstand long periods of dormancy. See the germination
data table.
Ideally,
you could be growing serratifolias, tanguticas and others,
even whilst awaiting the first germinations of your large-flowered hybrid seeds,
or species seeds such as C. texensis, C. viticella, C. fusca, C. viorna etc.
Most clematis books only give limited details of what to expect, when germination occurs. It's a case of, you teach yourself how, by doing it.
I think it is well worth getting hold of Prof. Norman C. Deno's paperback "Seed germination theory and practice", which sounds as though it's not for the layman, but is in fact quite a straightforward and interesting read. It is privately published, but you can find out where to get it from the B.C.S. or the I.Cl.S. websites.
The book gives information and data on the germination of about 2500 species, including many Clematis, and there has been a review of it by the B.C.S. in a recent Journal. "To plant a seed is a noble deed" states Prof. Deno; his approach is "every species has some mechanism for delaying germination until after the seed has been dispersed - the science of seed germination is the discovery and description of such mechanisms and the development of procedures for removing them, so that the seed can germinate". It is a practical guide, and you can get a lot of good information from this one source.
Notes about the viability of clematis seeds
Can definitely only speak from my own experience in my own location/conditions, and with regard only to the seeds with which I have had experience! It's wise to try not to be too specific in this regard, as things are bound to be at least slightly different, under conditions/weather/further variables differing from mine. Therefore please note, it's best to regard the germination times etc, quoted below, only as approximations! Everything is relative -so don't take it as gospel!
Generally: the smaller-seed/thinner-walled seed clematis, which mostly germinate quite quickly - 30-100 or so days, (you could call these seeds "type 'A' seeds"): I've certainly had plenty of germinations from seed between one to two years old. I find the viability seems to drop off after about 18 months to two years. I'd still plant them if I had no option, up to, say, three years, but I wouldn't be fed-up if not too many germinated.
I wouldn't worry about 'chilling the seeds' or 'stratification methods' in connection with these types of seed, they seem, in the main, to germinate fine without them; however, I've never found that it does them any harm if they do freeze, at some point, before germination occurs. It isn't a general thing; there are always exceptions (!) and a few of the smaller-type seeds do certainly seem to benefit from a chill period, in terms of germination speed.
The large-flowered hybrid-type seeds, and species such as the viornae, (texensis, crispa etc), viticella/the viticellas - all the (in the main) larger ones, with thicker, harder coats, (You could call these "type 'B' seeds"): I've had no problem with most up to about two+ years, then they seem to gradually start to lose viability. I've certainly had seed around three years old germinate, though, but not as high %. I have had germinations with slightly older seed, but those have been from collections, where the storage conditions are very good - constant, cool, dry, dark.
As per the above note, in general I find that the thinner-walled smaller types (species or cultivar) tend to germinate quite quickly and require no chilling. The other types, I find tend to hang about a bit, before germinating - about 180 to 600 days, the majority being about 200-450 days; they (in the main) definitely seem to respond to a period of cold; I get such seed into pots as soon as possible, especially now (it's November at time of writing), immediately before winter, so that they get the earliest chill OR freeze available. Sometimes, if you miss winter, and pot seeds up in say, February, you find they don't germinate until after the following winter, then they come up like cress. Some seem to like two complete winter periods. But even these will mostly germinate well, without any chill period at all, given sufficient time. This is an area of sparse information, save for personal experience!
There are a few that seem roughly intermediate in germination time - about 100-180 days, with or without chilling (type 'C').
As for myself, I
don't bother about chilling (or stratifying), nowadays. Seed all goes into pots
whenever it becomes available, and either they get chilled sooner (this winter),
or later (next winter)! This way, after the first year, you've always got
something coming up. I myself don't now use the Deno methods, nor bother with
stratifying (see notes above under
All my pots remain outside in the unheated greenhouses, all the time. They are covered, but only so as not to get any direct sunlight during summer, which 'cooks' the contents.
I keep pots for at least three years, because you will get surprises, and seedlings will suddenly appear, especially just after a winter. But only an occasional few will make you wait anything like this long, so you won't get a big build-up of old pots.
The Norman Deno book covers most aspects of dormancy in plant seeds, generally, and methods of breaking dormancy - periods of light and dark, alternating temperatures, with and without chemical treatments etc; in a particular germination environment, and some of his data refers to clematis of various kinds.
The notes on germination in the Magnus Johnson bible "The Genus Clematis", are well worth seeking out.
You might want to attempt to speed up the germination process, or it might be relevant depending on your climate:- you can "mimic" winter periods by placing seeds in plastic bags, mixed in a blend of moist sphagnum moss and sharp sand, 65:35 - and putting in the fridge - not the freezer. This isn't necessary (in the main, in my own experience) for thin-walled species and (thin-walled) cultivars' seeds (some atragenes, meclatis, etc) because they usually germinate fairly quickly without any special requirements. These seeds are usually small, and don't possess the bulk, or hardness, of their thicker-walled cousins.
I've seen a number of variations on the above theme, all basically similar, so it's not an exact science as such. Try three and six months periods prior to sowing, but check them whilst in the fridge regularly as well, just in case some decide to sprout relatively early. Some of the factors involved in the germination of many clematis types are still a little hazy as yet.
Don't use up ALL your seeds on this method - sow some seed in pots in the usual way too - because the time's going to pass anyway - so you might as well have some planted by the standard method because you know they at least WILL germinate, eventually.
As suggested above, ideally one might be germinating and raising faster-germinating seed, for example, C. serratifolia or C. tangutica, other 'orientalis group' seeds, atragene-group seeds, etc, whilst waiting for other seeds to germinate. The plants produced are no less beautiful than those which take more time.
Sowing the seeds, and after.
All of the following pertains to my location in North-West England. You may be near or far; your local conditions will differ from mine to some greater or lesser degree! **(However, if for reasons of climate or speed you need some information on "stratification" see the info. above: "Giving seeds cold periods")**

Mature large-flowered hybrid seeds
Immediately below the following general information there is a series of 23 pictures showing the main stages of sowing seeds.
Obviously I'm no Botanist or horticultural expert, but I have found that: Germination, for average LFH seed, and many species, is usually irregular, and can take a little while. Once your seeds are in germination pots, there is effectively little to do but to wait.
Of course, you should undertake to make certain that conditions remain favourable for germination throughout - attending to moisture levels; watching for any signs of fungus; removing weeds, insects, and so on. You do this each time you check for germinations; it won't involve a lot of work because, by and large, the polythene bags (within which seed pots may be enclosed) keep the environment pretty much how you'll want it, and only occasional remedial work may be necessary.
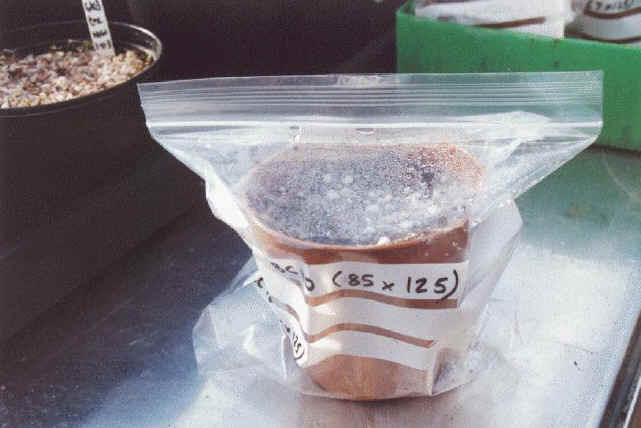
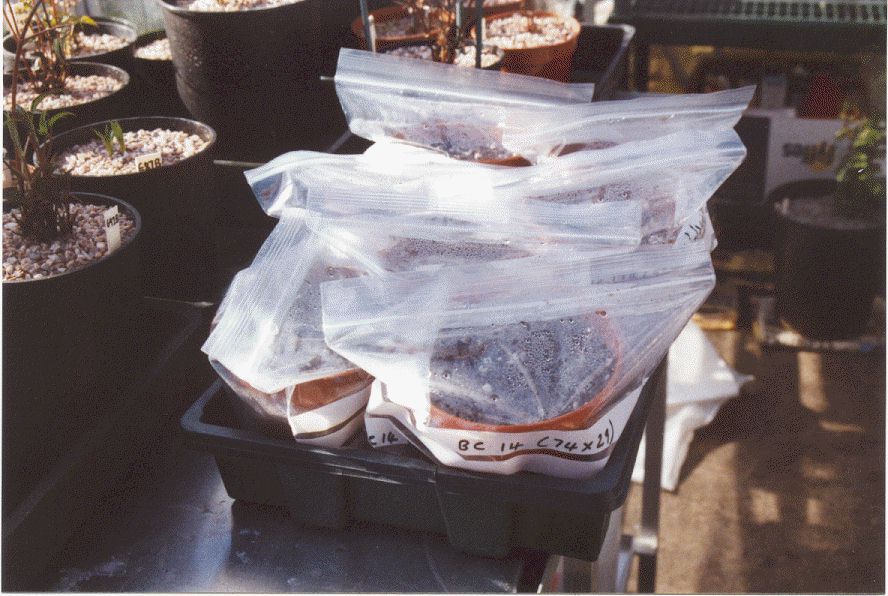
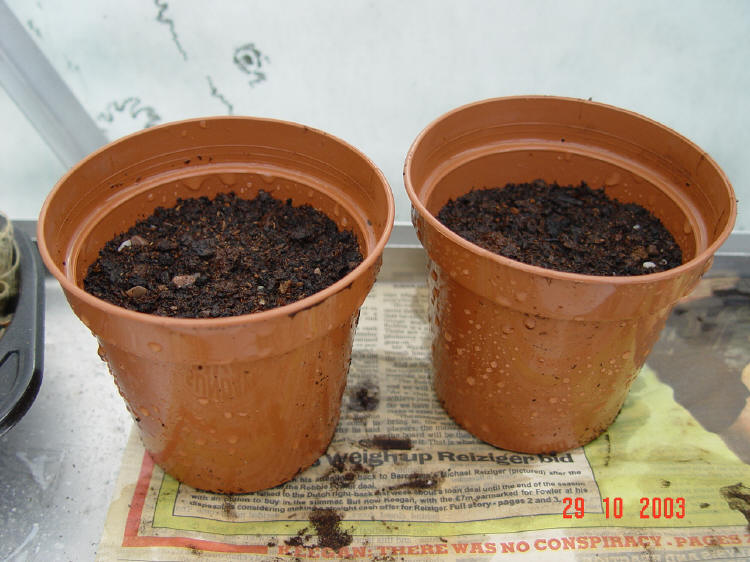
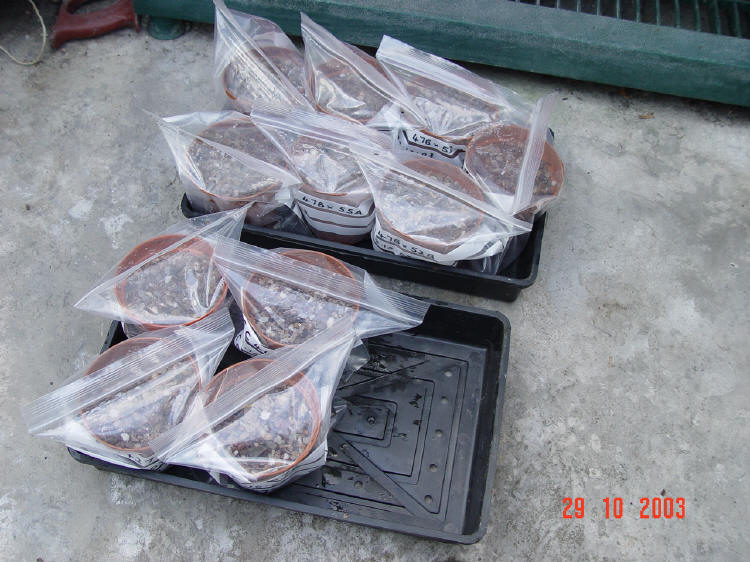
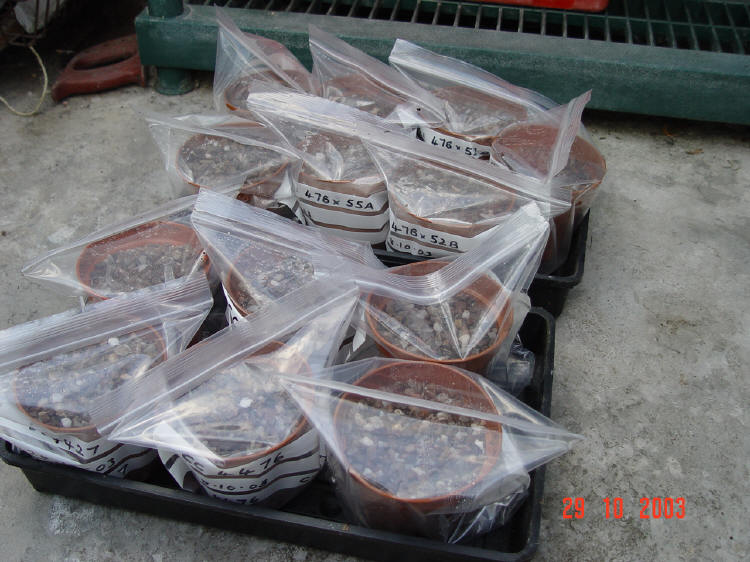
Pots fit "just right" Pots stored in trays
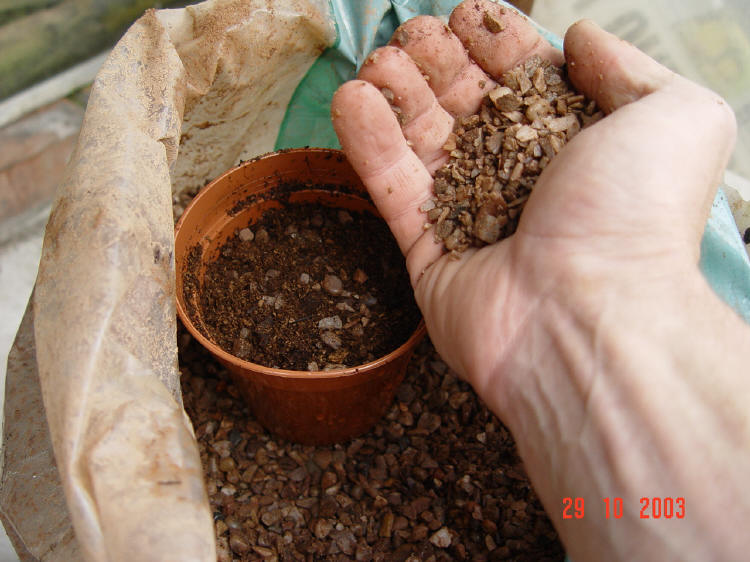
About twelve seeds per 4" pot; cover them to 1/2" with medium. As for the medium to sow seeds in; a basic 50/50 of (any decent) compost with peat (or sub.), plus (really) some grit or small gravel/stones for drainage, seems generally enough. (A detail:) The seed is an embryo, with a nutrient storage, in a shell. When the environment is right, the seed takes up moisture and embarks on its programme of development. There's enough storage to see it through to forming a root and a stem; the root brings in water and soluble nutrients, and the stem forms leaves at it's tips to gather light. The leaves are like plant solar-panels; they form in naissance, develop, unfurl, and begin to gather light energy. They also absorb Carbon Dioxide from the air, and use the sun's energy to convert carbon dioxide into sugar compounds. Sugar-type compounds are a primary reserve of energy for the ongoing process of growth.
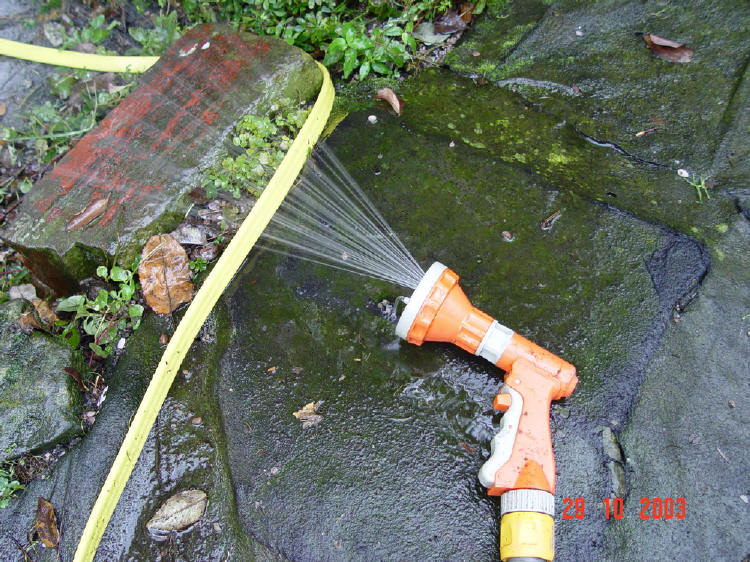
Any seedling won't like having to force a root through dry, compact soil. They don't like waterlogging either; they'll rot quickly. If the medium is just moist they'll produce a good root system quickly; the roots like light water passage with drainage; all the time, ideally. They can cope with the shortest dry period only. Put a thinnish but sufficient layer of gravel on the surface, of each pot; water at intervals, the gravel helps distribute water more evenly and conserves the moist; use a hose, but with a fine mist attachment; you can vary the power and degree of the spray. A check; fill four pots with soil as per above mix; add water to the four pots in increasing amounts. Watch to see when water is enough to percolate unfailingly through. Note the amount of water needed to cause percolation through. If possible keep total water mostly just below this amount.
Once the seeds are germinated, it won't be long before they are transplanted into separate pots; once in individual pots they will grow quickly, given reasonable conditions.
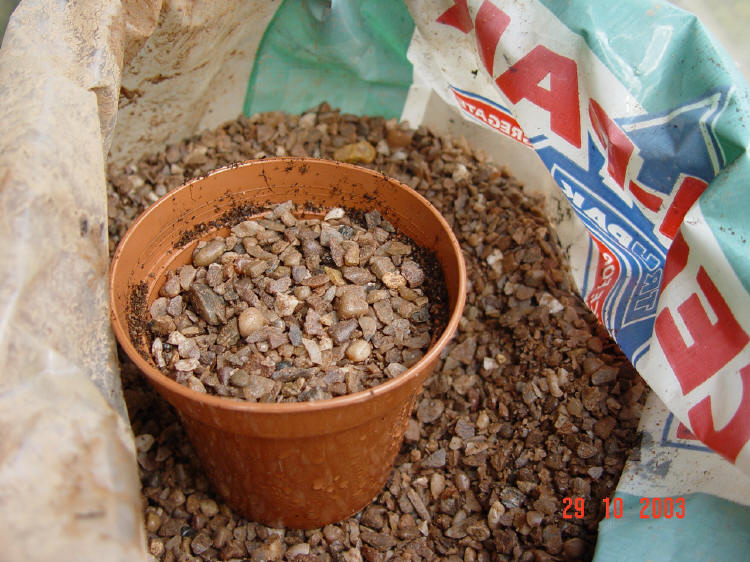
Top each seed-pot with a layer of fine gravel before putting in the bag. It makes everything neat and tidy and can help prevent some fungal and other problems.
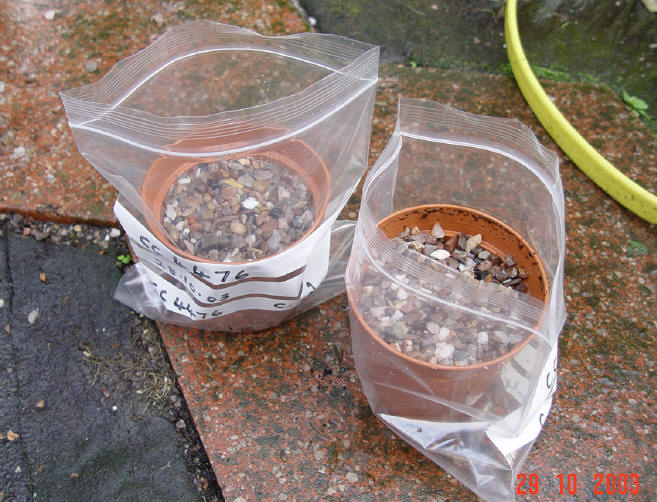
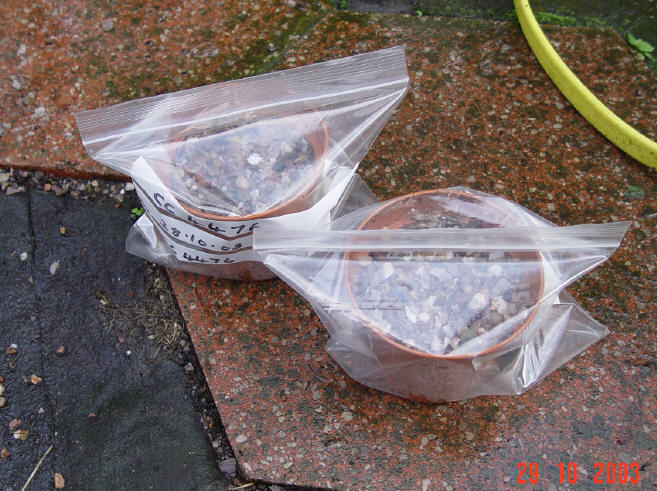
Apply a good wet of weak fungicide; make sure all the soil is moist, allow to drain for a few minutes; enclose in a top-sealing plastic bag. The ones I use accommodate the pot almost exactly, (photo above) and, when sealed, retain just the right level of moisture over a long period; they don't go misty during storage. Pots should be stored in trays, this makes handling them easy, about 6 or 7 pots per tray works ok. You don't have to use polybags; the seeds will germinate just as well without; but I find polybags ensure the best, stable, perfect environment, as required, over long periods, and therefore make storage, handling, and checking very convenient with less ongoing labour. Do ensure that direct sunlight cannot "cook" the contents!
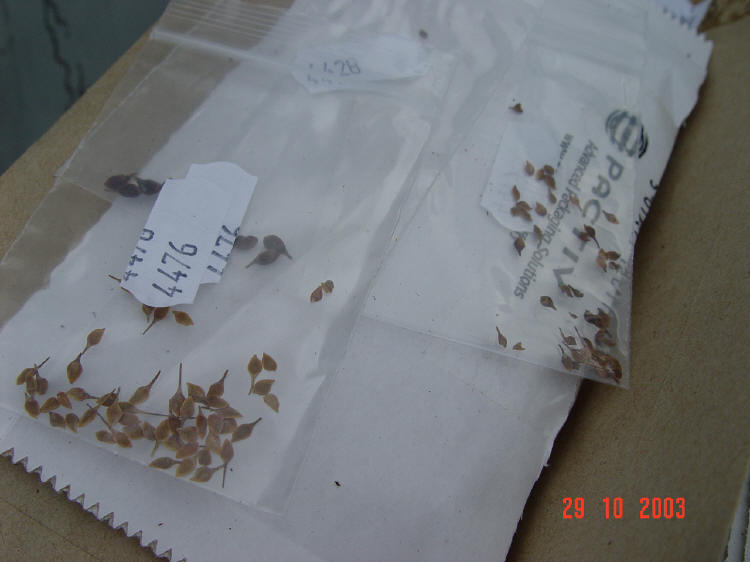
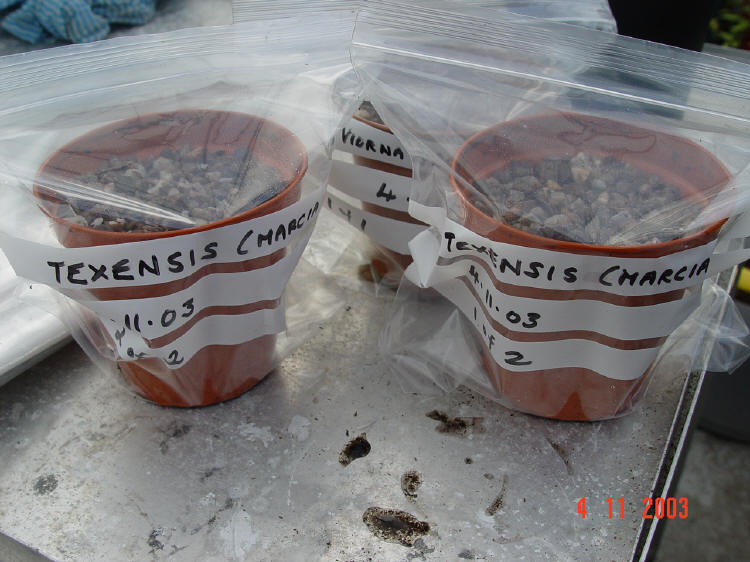
Write, using an indelible marker pen, (prior to insertion of pot!) on the outside of the bag the seed type, date of sowing, source. For "insurance" I sometimes put a label inside the bag, again written using indelible marker. In most cases this isn't absolutely necessary - you might choose to do it only with particularly important seeds, especially if you think they may take a good while to germinate: note - you know some "indelible" markers can fade with time or moisture exposure. Occasionally I've had instances where outside labeling has worn off - rarely though - and it can be a bit of a process (!) trying to read almost non-existent faded scribble. I know this is all commonsense stuff, once you've done it...I'm just trying to help you avoid the need to re-invent the wheel.
A series of photos showing a simple method of sowing seeds
We all do things differently! (Some variations are discussed after this summary). This is just one method! Sowing seeds is a particular thing, and one evolves a preferred method, over time. You can vary these outlines, below, to suit yourself, at every phase. You don't have to use pots, like I do, you can use seed-trays or any other convenient (or re-cycled) containers. I just happen to prefer small pots!
You can vary
the density of sowing, from 1 to perhaps 20 seeds or more per pot, it won't make
that much difference. I like about 12 per batch, because I can quickly deal with
12 new seedlings, but any more
Make certain that, once sowed, the seeds get a good wet.
I generally prefer to apply a dose of weak fungicide, just as a precautionary measure, but again, you can grow seeds well enough, without it.

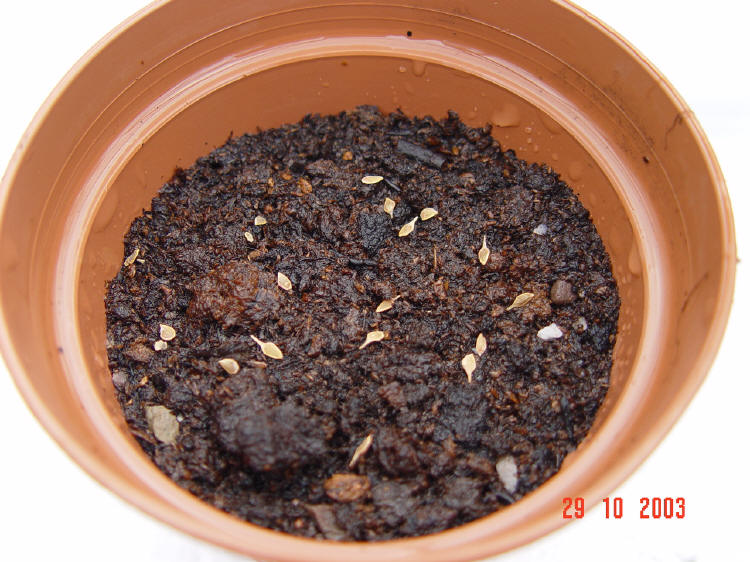
Get your hose ready and running! Decide which seeds batch(es) you are dealing with, and select the first of them. Spread them out on the surface so you can guestimate how many pots you will need. This many = two pots. You want about 12 or so seeds per pot, but it doesn't matter much if they are a little more thinly, or a little more thickly, spread. Drop the seeds onto the surface of the medium. This first pot contains a relatively small number of seeds....
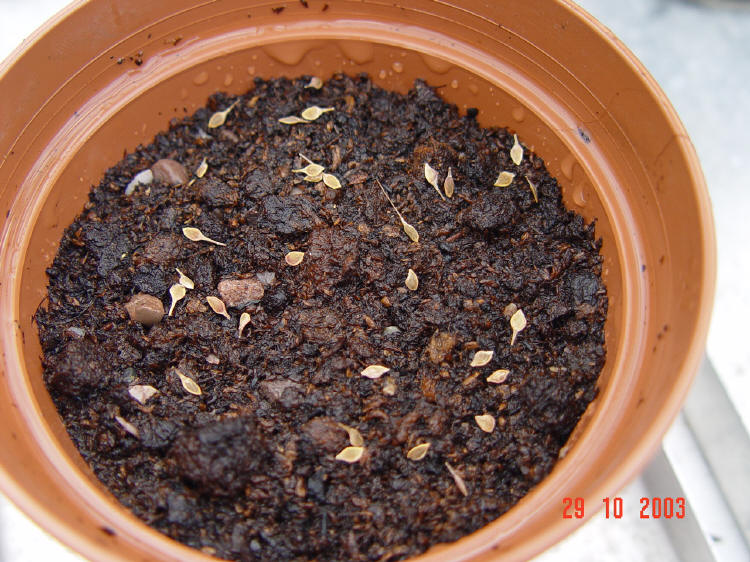
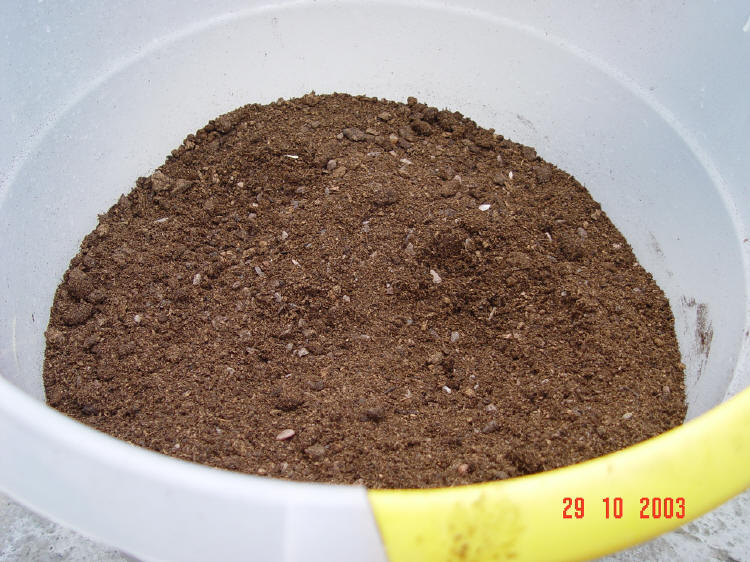
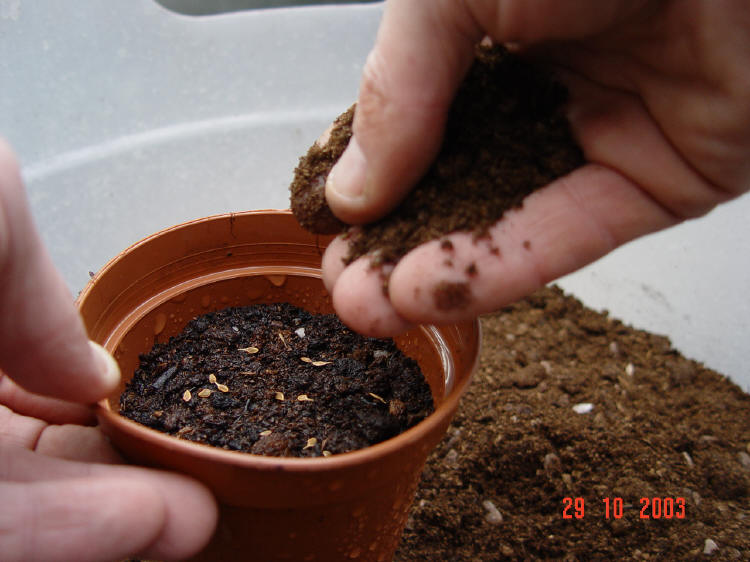
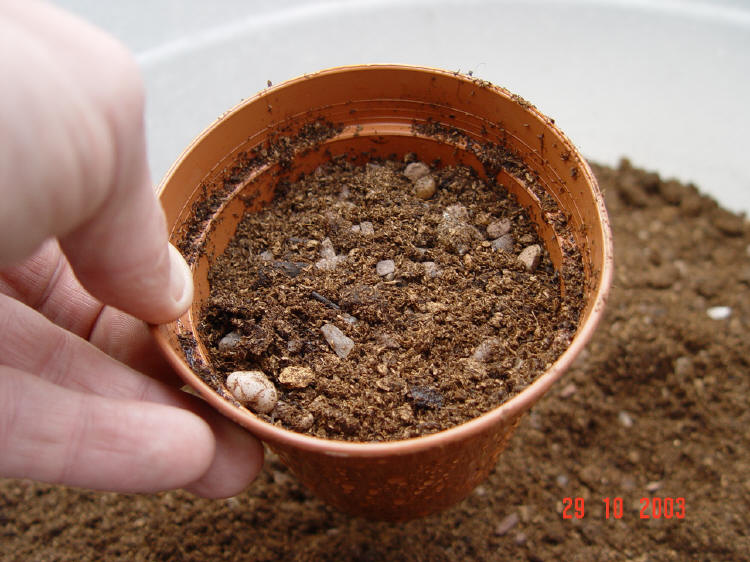
whereas this second pot, a few more. Your fresh new medium is awaiting, in the bucket (possibly, the most boring photo, ever, taken). Sprinkle medium onto the seeds so as just to cover them by a few millimetres, about a quarter of an inch. Firm it down slightly. Add a thin layer of gravel - you only need a thin layer - about a few or three millimetres, or a quarter of an inch - if you wish to use it. I like it because I find it helps maintain the moist, and keeps it evenly distributed, and also prevents some build-up of moss and liverwort, and weeds, amongst other good reasons. Lots of other people raise plants perfectly well without it, it should be added. But I just prefer a constant, cool, moist environment.
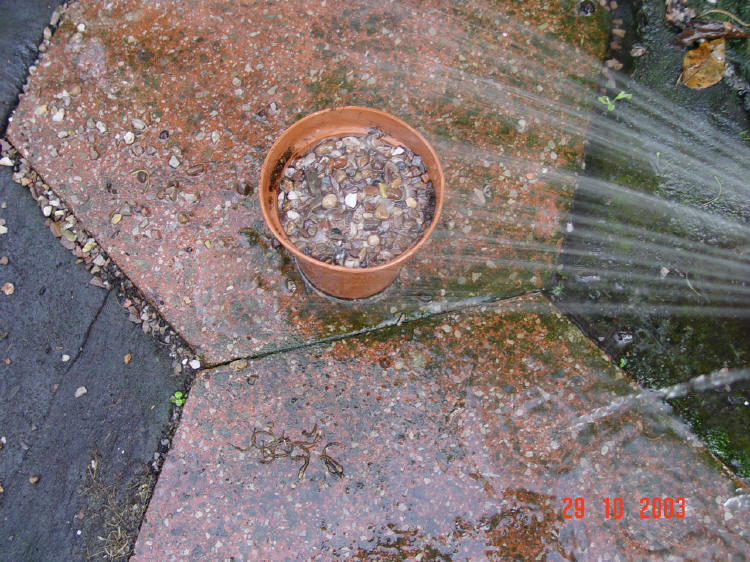
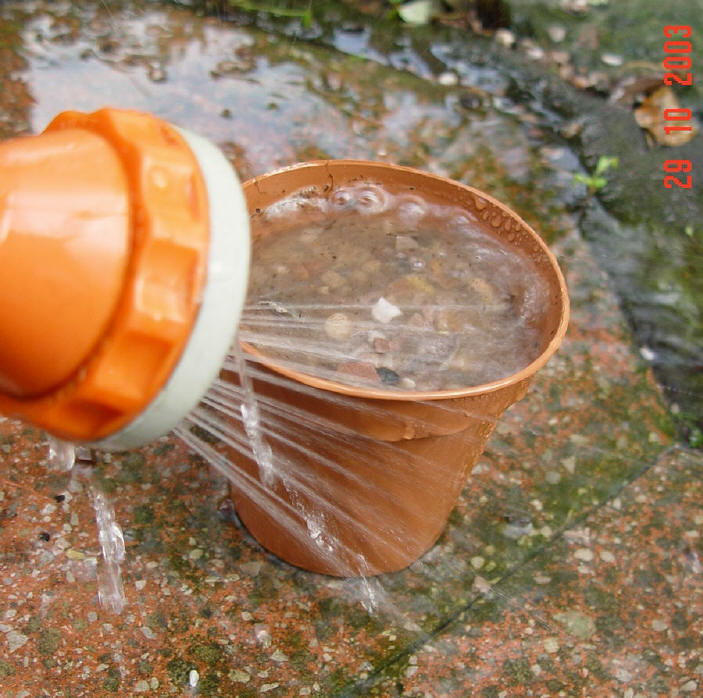
Stand the pot on a flat surface and give it a good watering. You won't disturb the seeds because they are under a layer of gravel and a layer of medium. Give it a really good wet. Wash out any soil particles, also go right around the pot with the sprayer, and clean off any soil or medium clinging to the outside of the pot, that is, make sure you clean the pot up thoroughly. Keep a wipe handy - for drying hands, while the pots are draining. You need dry hands to write on the bags with the marker pen. IMPERATIVE! Make sure all seeds are labeled, all the time. Write the identity of the seed, and the date sown, in INDELIBLE MARKER, on the seed-pot bags. These bags have a white band on the front, for just such a purpose.
Variations on the basic theme
The elements of the above simple basic method have been derived from several years' experience, and evolution of method. As is similar with many other things, it's a blend of what works well, first and foremost, with what is easy and practical, but not unnecessarily labour intensive. Clearly, one doesn't have to adopt it exactly, to be successful. One often comes across other raisers whose methods differ to a greater or lesser degree. Each to his own!
Containers: For germination, many people simply use recycled plastic food-containers, plastic cups, cut-down plastic bottles. Try to use containers which allow several inches depth for eventual roots. Don't forget to punch drainage holes in the base. Trays are also fine, as long as they offer two to three inches depth, at least.
You can leave pots in the light, or in the dark. See the comments above, about light. You can leave pots or trays out in the open, or you can enclose them in top-sealing plastic bags. Some people cover trays with a sheet of glass, brown paper, or board, to keep the medium moist.
Medium: I like a good compost with a little peat, plus grit. I buy standard compost and usually add a little peat and some grit: any decent medium, having good drainage properties will usually be ok. You can even use good garden soil, but you may find weed growth is more prevalent.
You can add a layer of gravel on top; or you can leave the medium open; I prefer to use gravel because it helps to maintain constant moisture conditions. I put pots in plastic bags for similar and other reasons, as more fully described, above.
Fungicide: If you keep very strict greenhouse hygiene generally, and you are lucky, and use high quality materials, you can dispense with fungicides mostly. But there will be times when fungicides, and insecticides also, or other control means, might very well be necessary. Therefore it's as well to get into the habit of keeping a minimum war-chest of such substances, in case the need arises with particular urgency. It will; from time to time: be prepared.
After sowing...
Once sowed, check your seeds once per week, preferably on a Saturday morning, when
you're not thinking about work! You'll have periods when nothing happens, and other times
when you will need to increase the frequency of checking, because germinations are
happening rapidly. See the germination data table below, to get an idea of what to
expect. You'll be aware that
some seeds are likely to germinate sooner than others, depending on the type of seed
sowed; therefore you will check these seeds from week one, whereas you may leave seeds
that take longer to germinate for a while, before you start checking.
If you lift the pot to
the light, any germinations are visible through the soft, clear plastic; nowadays the bags
don't degrade into mistiness like they used to. You might have to tap the condensation
down, if any. You get a knack for spotting germinations, even if at first you miss a few
due to not knowing what to expect. It usually doesn't matter if you miss a germination for
a while, not much will happen in a week.
I usually sow most LFH seeds towards the Autumn, because I like them to get the first
available Winter's chill. I find I get better germination that way.
I find I get most germinations (of LFH seed) after the winter cold has well set in; some
even during Christmas and New Year, then a further rush into and beyond Spring. Then
sporadically after that. But that's only under my conditions, and not meant to be a
generalisation. (Note there are no hard and fast rules; on the day of writing this
paragraph, 27th September 2000; two germinations of C. florida.)
The seedlings can easily be differentiated from weeds because of their appearance; they appear from the soil or gravel as a thin shoot about half-to-one centimetre long. The "spike" then unfurls and the first (seed) leaves are visible. (Images follow after next few paragraphs). Depending on conditions the spike may hold its form, sometimes for considerable periods of time, especially if it's cold out - don't worry too much; or progress on to the next sets of leaves. I've even had seedlings apparently die, only to reappear when things warm up a bit. (Clematis seedlings are much more resilient than they may appear). All this is expanded upon on the Growth page.
After some time has elapsed, you might think that nothing will ever appear, but suddenly, out of the blue, you'll notice sprouts, and you can then observe the emergence of the seedlings. Immediately rescue the pot from wherever it is stored, and place in the light - though not direct sunlight. Open the bag (if one used) to allow air to circulate. Water sparsely but don't allow to dry out absolutley.
If you've never seen clematis seeds germinate before, you'll think, "how will I know what they'll look like?"; but, when you see germinations, you'll think, "those are definitely the clematis".

As soon as you have germinations, label them. Actually there are four germinations here; only one has so far cleared the gravel. 1/11/2001
Once seedlings
begin to appear I check, over a period, to see just how many are coming, and
also how quickly they're coming through. Usually I re-pot the number I
require into small pots (photo) as soon as
I can handle the seedlings; any seeds left, together with any seeds only
just beginning to germinate, I put back in the pot, water-in, and return whence.
(Disturbing, at this stage, any seeds which are really only just starting
to germinate can be fatal to them, its true; so don't re-pot until you've got
the minimum number you want from that batch, at the right growth stage. You
might sometimes want as many as possible, you might othertimes not need so many.
It depends what they are. The number of plants you can handle is dependent on
the time you can make available.
I add the letter "R" for "remainder", before the original germination-number, on the existing label. Then if further germinations do appear later, I can if I wish add the new seedlings to the existing sequence, knowing which batch they've come from.
See photos on the growth gallery page.
Whilst all this is happening try to keep everything as clean as you can. Don't let clutter
or plant debris, loose soil, - detritus - accumulate. Clean out under trays or pots
from time-to-time. If using pots, put them in trays to make handling numbers of pots that
much easier. You must maintain hygiene as best you can where seedlings are concerned; I
know its a general rule, but it's fundamental. You don't want to lose seedlings to
"damping-off" or anything one might possibly avoid, it's a waste of effort and
waiting-time. When moving plants, or checking your seeds and plants, make it a habit to
clear up, as well, as part of the process.
You should be able, after a bit of practice, to attain high germination success rates. I don't think there's any special knack, save persistence. The only difference with clems is TIME. As long as you maintain the right conditions, you'll succeed in due course. Don't give up. Once the first batch come through, you'll have successive germinations, assuming successive sowings. Remember, the time's going to pass anyway. So get your preparation and sowings done straight away, the sooner they are in, the sooner you'll have seedlings, then flowers.
Once seedlings are up and running development can be quick. Details about raising plants from this stage follow on the Growth page.
Overwintering Seedlings in the Greenhouse
I no longer worry about general light, winter frost, too much, if that's when they happen to germinate. If you can protect germinations and seedlings from the worst of it, fine, a little heating is very helpful. I store my pots both in a cold greenhouse, under the staging, covered with fleece; and also outside, exposed to the elements, awaiting germination. When the seedlings appear, if it is particularly cold outside I will bring some into the house (softy). But by and large the seedlings will come through a light frost ok. If it gets seriously cold, and frozen, and the outlook is 'more of the same', bring them in straight awaY. Don't allow seedlings to be unnecessarily frozen.
Of course, you can
plan to prevent frost if you wish to, by
various heating means. Again, this is only as pertaining to my location in
England, where we have relatively mild winters - usually, but not always! (As seems the
trend in recent years, last Autumn, 2000, was extremely wet in the UK; and very mild, so
far). (Well, now we're in Spring I can tell you Winter was cold!; and floods all around
the Country!)
Your chief concern are seeds which actually germinate during a very cold spell. It can be useful to have sufficient heat available to warm things for a shortish spell. Or you might choose to selectively bring new germinants indoors awhile, to tide them over the harshest conditions. Having said that, even newly-emerged seedlings have, on occasion chez moi been surprised by sudden cold, and have been frozen, but, on thawing, have nevertheless produced a new shoot, or just resumed growth. Clematis seedlings, generally, are very tough. You won't lose many to reasonably modest levels of frost, as long as they are in the greenhouse, at least. But it is prudent to perhaps pamper your most prized germinations for a while, particularly if the cold persists, just in case.
I am referring to conditions in Manchester, UK, where our coldest spells (I shouldn't say this) are usually relatively short in duration. Once seedlings develop the beginnings of a root system they are already usually able to withstand some reasonable frost, to a significant degree.
Any seedlings germinated and potted earlier in the season, which have established to some extent, will usually be fine through winter; the foliage on these seedlings will mostly die down and rot. The vines will often persist, sometimes, carrying live buds in the axils (between the leaf-stalk and the stem). On very young seedlings, if the foliage is going to rot anyway at the end of the season, it is best to remove it by pruning even young plants down quite severely. Don't worry; even young plants will surprise you with large-sized shoots or buds in due course. If you're a bit reticent to prune young plants at the end of the season look at the photos on the Growth Gallery page, you'll see how keenly they come back in Spring (and before).
Special note: 'Hardening seedlings off', after periods indoors
Seedlings � very young ones � do not like TOO MUCH cold! They will come through some slight frost, no problem, but not many seedlings will withstand freezing temperatures proper, for too long. The aim should be to avoid any periods of extreme cold. Therefore, if you happen to have seedlings actually germinating in the depths of Winter, in the unheated greenhouse, or outside - or if you have very young seedlings which emerged just prior to the onset of winter - naturally enough you might decide to avoid extremes of cold, by bringing such seedlings into the house, or some other, warmer place, for some shortish time period, for the duration of such colder weather.
A note prior to the main point.
A good place is a well-lit window area, free from draughts, during the day and the night.
In the home, it�s important to bear in mind DAMPNESS. Don�t leave the seedlings anywhere near a source of water or water vapour! For example, NOT too near the sink; NOR too near a drain of any kind; NOT close to any kitchen device that produces a flow of damp air; NOT near any dishwasher or washing machine; NOT near a kettle! The reason for this is that such places can have a tendency to foster the establishment of FUNGAL INFECTION in the tiny plants. The last thing you want in young seedlings is a fungal problem of any kind. Before you know it the seedlings keel over, and often cannot be rescued. So guard against this possibility in advance, by careful siting of the pots.
Once seedlings have been indoors for two or three days, they begin to notice the change to a warmer environment. Some seedlings may begin to grow a little more quickly; leaves may be produced at a slightly faster rate than expected, the pots may dry out more quickly than would otherwise have been the case etc. This in itself in not harmful. The problem comes when seedlings are later returned once again back to their normal outside locations, in the greenhouse, or elsewhere in the garden, which is of course still subject to the normal winter outdoor temperatures cycles.
Having �gotten used� to the warmer indoor temperatures, it can be quite a shock for seedlings to find themselves suddenly exposed to relatively harsh conditions, and, if you are unlucky, and a particularly cold night occurs, just after the seedlings have gone back outside, you might well lose some overnight, due to the sudden cold. In other words, the seedlings need a brief period to re-adapt to the cooler temperatures. So, don�t put seedlings that have been indoors for more than about, say, three days, immediately back into the cold house. Let them have two or more days where they experience slightly cooler conditions outside, during the day, but bring them back in again at night, for at least a couple of days, or until temperatures outside are back to a tolerable norm.
So, when necessary, get them out of cold quickly, but phase them back into the cold slowly, by degree.
****
Seedlings - basic notes
Once the second set of leaves is visible I turn out the pot (all its contents) onto a level surface. Carefully coax the whole cylinder of soil and seeds, roots now clearly visible, from the pot and onto a sheet of newspaper or similar. The paper makes handling the pot's contents easier. Also, when you have finished, it�s easy to clear up, because all the soil is still on the sheet - saves getting soil in every nook and cranny.
The soil should not be completely dry; if need be, dampen it. (Buy a couple of small spray-bottles). Ideally the mix should 'give', under finger pressure. The individual seedlings can be carefully teased from the mix and re-potted into small pots, taking care not to firm too much, also, top-up each pot with very fine gravel if available. Water each small pot to re-establish the roots, and moisten the new compost, to encourage root growth. A weak fungicide may be utilised at this time. Add a few granules of slow-release fertiliser, if available; if not, don't worry, the new soil should provide sufficient nutrient until the next potting-on stage is reached. You'll want your compost to have some peat (or substitute) to retain moisture, but with some grit to aid drainage.
Bear in mind that plants need water, nutrient, light, carbon dioxide and a reasonable degree of warmth.
Clematis LFH seedlings can come on really quickly. You might find you move from a small pot to a 1-litre pot; then from a 1-litre to 2-litre pot, in one season, and be able to produce a flower in the same year; however, some sources of information I have seen suggest removing early flowers, on the one hand to strengthen (in the sense "to not weaken") the plant, and on the other hand because early flowers are not always representative, anyway. Like many things it's a matter of trial and error, over time, and dependent on a range of factors; the more experience you gain as a raiser, the better your eventual results in all aspects.
Information about the raising of the seedlings from this point on continues on the GROWTH page.
SOME DATA ON
THE GERMINATION OF VARIOUS CLEMATIS SEEDS
For anyone interested, summarised below is some data relating to time taken for
recent sowings to germinate. Germination is dependent on several factors: temperature;
water availability; light; Gibberellins; seed age/condition/storage - fresh or dry; etc;
it is not possible to know exactly when any given seed will sprout, so the following is
intended just as a general guide as to what you might expect.
Some GERMINATION DATA
Germinations data prior to 1998 to be added shortly
| Seed | Sow date | Germination | Time taken -days |
| C. serratifolia #1 | 1/3/8 | 2/4/8 | 30 |
| C. serratifolia #2 | 1/3/8 | 2/4/8 | 30 |
| C. annemeike | 2/6/8 | 30/6/8 | 28 |
| C. napaulensis | 11/7/8 | 22/9/8 |
71 |
| C. viticella mix | 11/7/8 | 14/10/8 | 134 |
| LFH mix | 8/2/8 | 23/10/8 | 284 |
| C. drummondii | 9/8/8 | 23/10/8 | 256 |
| "golden tiara" | 4/10/8 | 30/10/8 | 26 |
| "golden tiara" | 4/10/8 | 13/11/8 | 40 |
| viticella mix | 30/5/8 | 29/11/8 | 180 |
| LFH mix | 7/2/8 | 29/11/8 | 292 |
| viticella mix | 30/5/8 | 12/12/8 | 193 |
| LFH mix | 7/2/8 | 19/12/8 | 320 |
| LFH mix | 7/2/8 | 25/12/8 | 326 |
| viticella mix | 30/5/8 | 26/12/8 | 209 |
| C. crispa | 30/5/8 | 29/12/8 | 210 |
| C. macro "snowbird" | 9/8/8 | 10/1/9 | 150 |
| LFH mix | 7/2/8 | 10/1/9 | 336 |
| C. fusca violacea | 30/5/8 | 22/1/9 | 232 |
| C. fusca violacea | 30/5/8 | 21/6/9 | 360 |
| C. delavayii | 10/11/8 | 4/2/9 | 87 |
| C.viticella "Joan Baker" | 30/5/8 | 6/2/9 | 250 |
| C. connata | 10/11/8 | 19/2/9 | 102 |
| golden tiara | 7/2/9 | 27/2/9 | 20 |
| C. orientalis | 7/7/8 | 6/3/9 | 35 |
C. akebiodes |
12/12/8 | 20/3/9 | 98 |
| C. potanini Denny | 12/12/8 | 20/3/9 | 98 |
| C. aesthusifolia | 20/2/9 | 28/3/9 | 37 |
| C. x 'cylindrica' | 14/7/8 | 1/4/9 | 167 |
| LFH mix | 7/2/8 | 30/1/9 | 360 |
| C. fusca violacea | 30/5/8 | 23/6/9 | 360 |
| LFH | 7/2/8 | 6/4/9 | 427 |
| C. crispa (Canada) | 20/2/9 | 10/7/9 | 140 |
| C. fusca blue | 20/2/9 | 12/7/9 | 142 |
| C. 'Aljonushka' | 12/12/8 | 9/8/9 | 240 |
| C. florida | 20/3/9 | 12/9/9 | 170 |
| LFH white mix | 20/3/9 | 2/9/9 | 160 |
| LFH Kinugasa | 20/2/9 | 16/9/9 | 210 |
| C. patens | 10/11/8 | 12/9/9 | 305 |
| LFH | 13/6/8 | 12/9/9 | 450 |
| C. viorna | 12/12/8 | 12/9/9 | 270 |
| texensis hybrid mix | 20/2/9 | 12/9/9 | 200 |
| LFH King Ed. VII | 17/10/8 | 12/9/9 | 325 |
| * C. texensis Matizza | 1/11/8 | 13/9/9 | 340 |
| C. florida | 20/3/9 | 12/9/9 | 170 |
| C. crispa | 12/12/8 | 12/9/9 | 270 |
| C. pitcherii | 10/2/9 | 16/9/9 | 210 |
| C. viorna | 12/12/8 | 24/9/9 | 284 |
| C. versicolor | 20/2/9 | 1/10/9 | 221 |
| C. King Ed VII | 17/10/8 | 2/10/9 | 250 |
| C. Ruri/VuruOkashi | 20/2/9 | 2/10/9 | 225 |
| C. patens NARA | 20/2/9 | 2/10/9 | 225 |
| LFH WHGC | 10/10/8 | 9/10/9 | 365 |
| C. fusca Kamschatica | 20/2/9 | 2/10/9 | 292 |
| C. patens Tsuyama | 20/2/9 | 17/10/9 | 240 |
| C. patens | 18/7/8 | 29/10/9 | 455 |
| C. japonica | 20/2/9 | 3/11/9 | 253 |
| C. addisonii | 24/4/8 | 6/11/9 | 440 |
| C. texensis | 8/12/8 | 12/11/9 | 330 |
| C. patens | 18/7/8 | 12/11/9 | 481 |
| LFH batch | 7/2/8 | 25/11/9 | 640 |
| C. texensis Nowacki | 1/11/8 | 11/12/9 | 400 |
| C. viorna | 20/2/9 | 31/12/9 | 280 |
| C. texensis P.Loos | 12/12/8 | 8/1/0 | 339 |
| LFH mix | 10/10/8 | 8/1/0 | 339 |
| C. campaniflora | 20/2/9 | 15/1/0 | 325 |
| C. delavayii | 6/11/9 | 17/1/0 | 90 |
| C. texensis Nowacki | 1/11/8 | 4/2/0 | 457 |
| LFH GEN SIK | 25/10/8 | 13/2/0 | 460 |
| LFH mix | 30/5/8 | 13/2/0 | 590 |
| viticella mix | 30/5/8 | 13/2/0 | 590 |
| C. 'Joan Baker' | 14/6/8 | 20/2/0 | 608 |
| C. florida | 20/2/9 | 2/4/0 | 405 |
| C. florida | 11/9/99 | 27/9/00 | 382 |
| C. texensis P.Loos | 29/10/98 | 03/01/01 | 792 |
* This particular
batch of C. texensis seed gratefully received from Dorothy Matizza in Tarpley, Texas.
Germinations data between January 2001 and April 2003 to be added shortly.
Some further germination data.
Seed germinations 2004 and aroundabouts.
| Germination No. | Germination Details | Time taken |
|
C. speciosa MHolt 20/02/03-09/04/03 |
47 days | |
|
C. macropetala white MH 20/03/03-17/04/03 |
56 days | |
|
C. ochroleuca 20/02/03-28/09/03 CL |
218 days | |
|
C. texensis BR 12/05/03-12/11/03 |
180 days | |
|
C. patens Tuysma 20/02/03-15/01/04 |
360 days | |
|
C. reticulata BCS 20/02/03-12/03/04 |
386 days | |
|
C. phlebantha MB 15/12/03-28/04/04 |
133 days | |
|
C. orientalis Til Yung 28/01/04-21/03/04 |
50 days | |
|
C. coactilis P176 28/10/03-15/06/04 |
227 days | |
|
C. buchananiana 20/02/03-22/06/04 |
485 days | |
|
C. (florida x versicolor) 18/10/03-30/07/04 |
280 days | |
|
C. glaucophylla BCS 14/02/04-11/08/04 |
180 days | |
|
C. (Suzymac x P99 blue viticella new) 18/10/03-11/08/04 |
310 days | |
|
C. texensis hybrids mix BCS 14/02/04-31/08/04 |
310 days | |
|
C. (patens seedling x C. coactilis) 18/10/03-17/08/04 |
303 days | |
|
C. �Helen Cropper� 12/11/03-17/08/04 |
270 days | |
|
C. florida species MB 28/01/04-17/08/04 |
210 days | |
|
C. (lanuginosa-type seedling x viornae-hybrid) 04/11/03-14/09/04 |
310 days | |
|
C. crispa BI 12/11/03-20/09/04 |
310 days | |
|
C. (patens seedling x viornae-hybrid) 18/10/03-21/09/04 |
340 days | |
|
C. (patens seedling x C. coactilis) 18/10/03-29/09/04 |
350 days | |
|
C. texensis Marcia (batch 1) 14/11/03-9/10/04 |
335 days | |
| C. 'Helen Cropper' 12/11/03-12/10/04 | 325 days | |
| C. (patens x viornae hybrid) 18/10/03-25/10/04 | 372 days | |
| C. (large-flowered white hybrid x C. texensis) 2/10/03-25/10/04 | 390 days | |
| C. (large-flowered blue hybrid x C. viornae hybrid) 4/11/03-25/10/04 | 355 days | |
| C. (large-flowered white hybrid x C. texensis) 28/10/03-10/11/04 | 375 days | |
| C. texensis 12/5/03-12/11/04 | 540 days | |
|
C. texensis very dark red form 12/11/03-22/11/04 |
375 days | |
| C. (patens seedling x viornae hybrid) 18/10/03-30/11/04 | 388 days | |
| C. (large-flowered hybrid x C. texensis) 18/10/03-30/11/04 | 388 days | |
|
C. texensis MB form 12/6/03-6/12/04 |
528 days | |
|
C. texensis very dark red form 6/11/03-15/12/04 |
402 days | |
|
C. texensis very dark red form 12/11/03-15/12/04 |
396 days | |
|
C. texensis CL form 12/11/03-15/12/04 |
396 days | |
|
C. "USA Mix" 14/2/04-22/12/04 |
308 days | |
| G159 |
C. texensis SD1 6/11/03-23/12/04 |
425 days |
| G160 |
C. (patens seedling x viornae hybrid) 18/10/03-8/01/05 |
445 days |
| G161 |
C. texensis Marcia (batch 2) 4/11/03-8/01/05 |
429 days |
| G162 |
C. (patens seedling x viornae hybrid) 18/10/03-8/01/05 |
445 days |
| G163 |
C. texensis SD 12/11/03-8/01/05 |
421 days |
| G164 |
C. (lanuginosa-type seedling x C. pink texensis) 08/10/3-13/1/05 |
470 days |
| G165 |
C. texensis Marcia (batch 3) 4/11/03-17/01/05 |
438 days |
| G166 |
C. (large-flowered white hybrid x C. texensis) 28/10/03-24/01/05 |
450 days |
| G167 |
C. texensis (Cressgarden) 12/05/03-24/01/05 |
606 days |
| G168 |
C. texensis (Cressgarden) 12/05/03-24/01/05 |
606 days |
| G169 |
C. texensis hybrids mix BCS 20/02/03-24/01/05 |
695 days |
| G170 |
C. texensis hybrids mix BCS 14/02/04-14/02/05 |
365 days |
| G171 |
C. texensis Cressgarden 12/05/03-19/02/05 |
637 days |
| G172 |
C. texensis Pink S. Denny 12/11/03-20/03/05 |
490 days |
| G173 |
C. texensis (Cressgarden) 12/05/03-27/03/05 |
680 days |
| G174 |
Unidentified Nepal species 28/01/04-14/04/05 |
440 days |
| G175 |
Unidentified Nepal species 28/01/04-18/04/05 |
444 days |
| G176 |
C. texensis 20/02/03-21/04/05 |
790 days |
| G177 | C. G75C C. patens "K. Diane" x C. coactilis P176 Cross 1/04: 24/9/04-8/8/05 | 314 days |
| G178 | C. G67 Suzy Mac x C. integrifolia var latifolia 18/10/03-23/8/05 | 660 days |
| G179 |
C. G75C patens (KD) x G55A texensis 30/10/04-24/8/05 |
305 days |
| G180 |
C. G75C (KD) patens x G55a texensis 30/10/2004 - 06/09/2005 |
315 days |
| G181 | C. "Moira" 10/10/2004 - 6/09/2005 | 330 days |
| G182 |
C. texensis (Mike Brown) 15/06/2003 - 06/09/2005 |
810 days |
| G183 | C. texensis BELL 12/05/03-10/10/05 | 810 days |
| G184 | C. large-flowrd hybrid G65D x C. tex SD1 Cross 12/04 30/10/4-19/10/5 | 354 days |
| G185 | C. texensis Cresson 12/5/03-10/10/05 | 810 days |
| G186 | C. lfh G73F x texensis SD1 (Cross 11/04) 30/10/04-2/11/05 | 367 days |
| G187 | C. lfh G73F x texensis SD1 (Cross 11/04) 30/10/04-2/11/05 | 367 days |
| G188 | C. lfh G65D x texensis SD1 (Cross 14/04) 30/10/04-2/11/05 | 367 days |
| G189 | C. lfh G65D x texensis SD1 (Cross 14/04) 30/10/04-2/11/05 | 367 days |
| G190 | C. LFH G65D x G87 campaniflora 3/1/5 - 25/12/5 | 352 days |
| G191 | C. pitcheri 178 x C. campaniflora 16/10/4-10/1/06 | 450 days |
| G192 | C. texensis (MB) 15-6-03 - 21/01/06 | 935 days |
| G193 | LFH G95B x 178 pitcheri 30/10/04-28/01/06 | 445 days |
| G194 | C. patens G75A x 176 coactilis (Cross 06/04) 30/10/04-16/02/06 | 460 days |
| G195 | C. (seed of) "Betty Corning" SM 3/1/05-6/3/06 | 425 days |
| G196 | C. "Moira" 10/10/04-6/3/06 | 505 days |
| G197 | C. G75A patens x 176 coactilis Cross 6/04 30/10/04-12/03/06 | 490 days |
| G198 | C. G75A patens x 176 coactilis (Cross 6/04) 30/10/04-25/3/06 | 510 days |
| G199 | C. G95B FLH x 186 texensis (Cross 25/04) 30/10/4-2/4/06 | 520 days |
End of page