Hybridising your own Clematis - for amateurs
If you want to try to hybridise your own plants it's not that difficult a task. Even an ordinary amateur like me or you can manage it; and it will multiply your enjoyment of the process of germinating and raising seeds ad infinitum.......that's not only because are you growing new, unique plants, but also because they're YOUR new plants. You will be the very first person to see these new flowers, which, without fail, will be ultra-fascinating and very exciting.
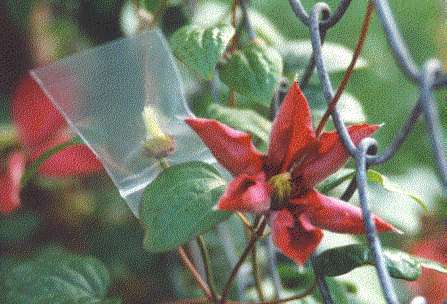
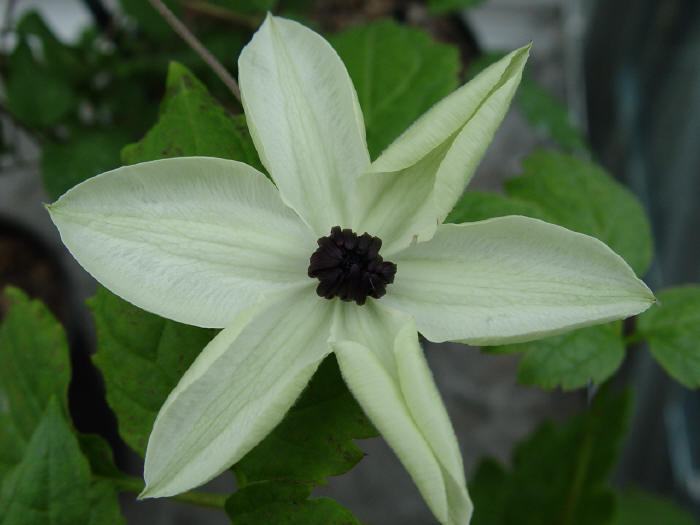
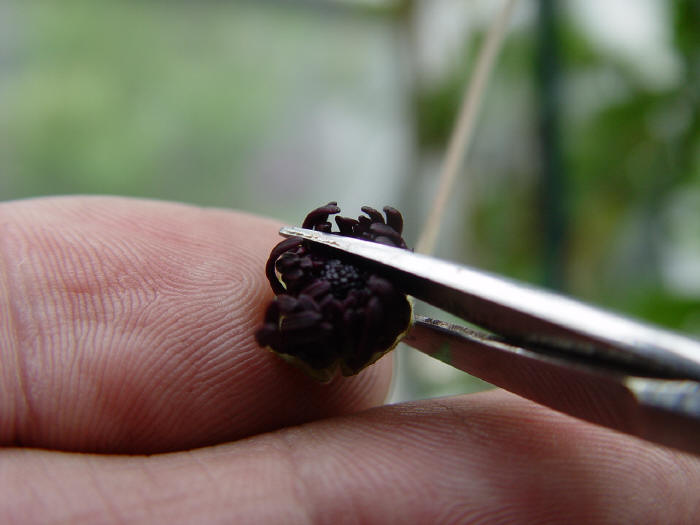
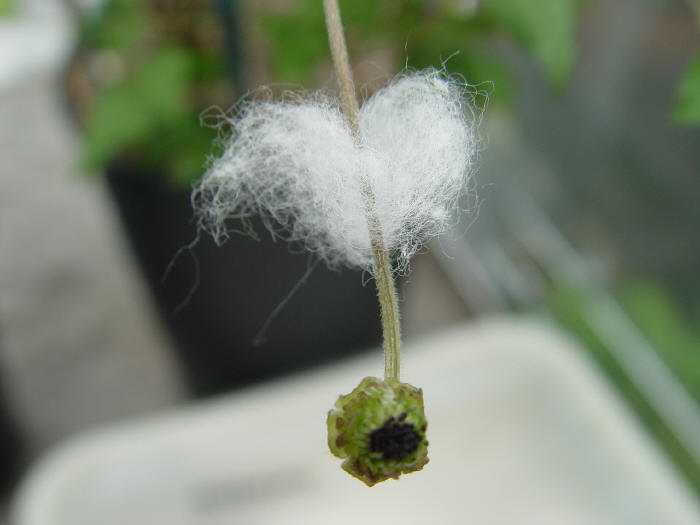
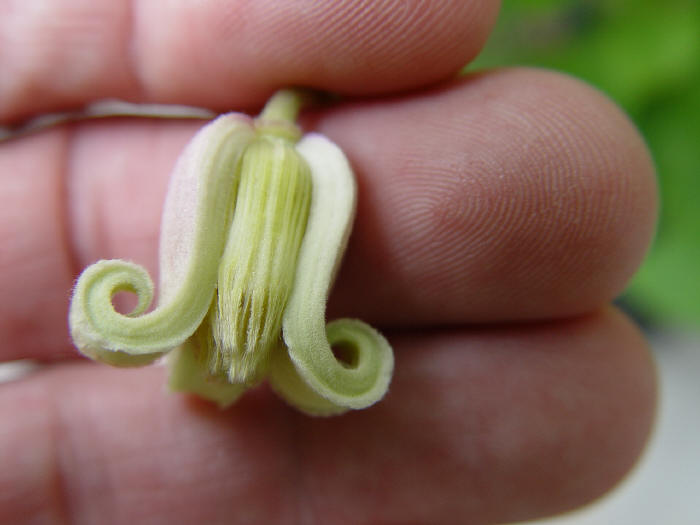
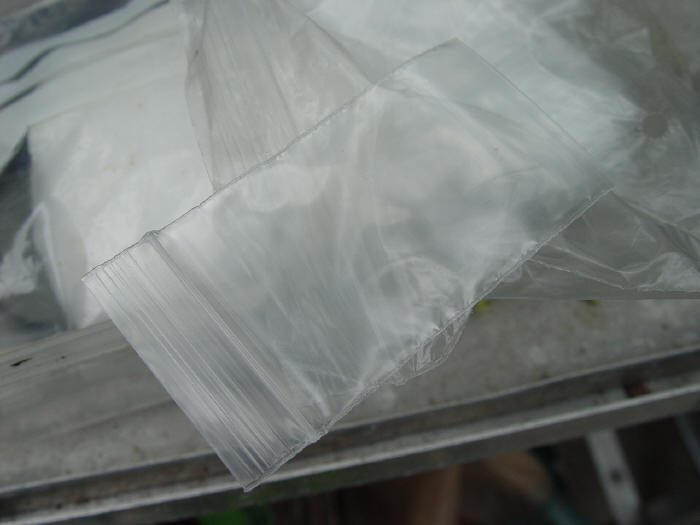
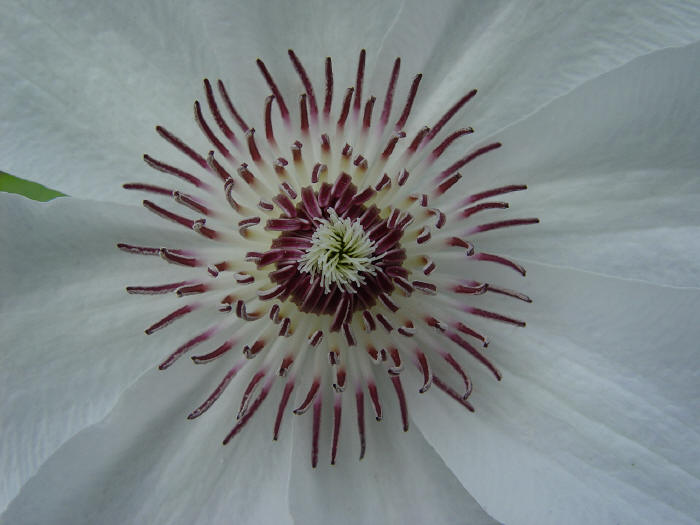
Amateur - but reasonably
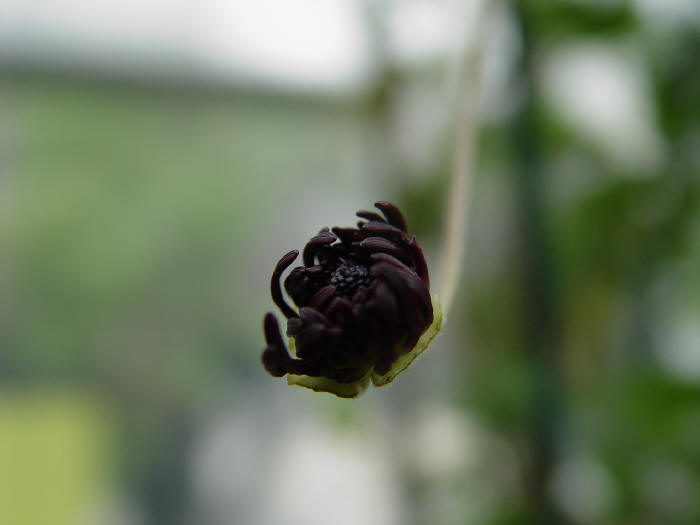
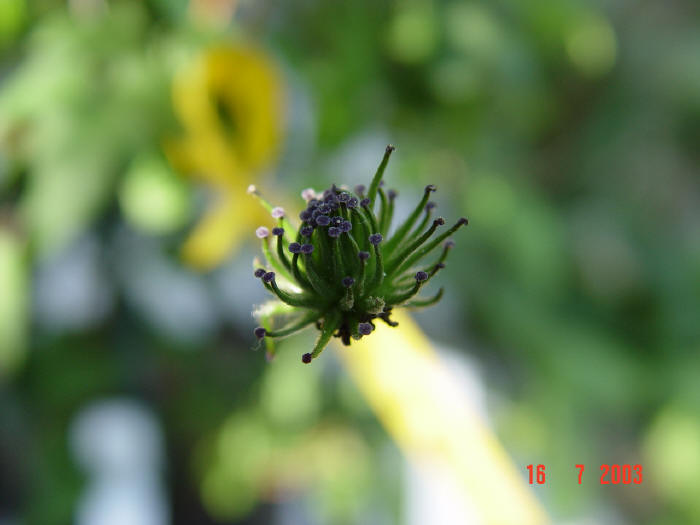
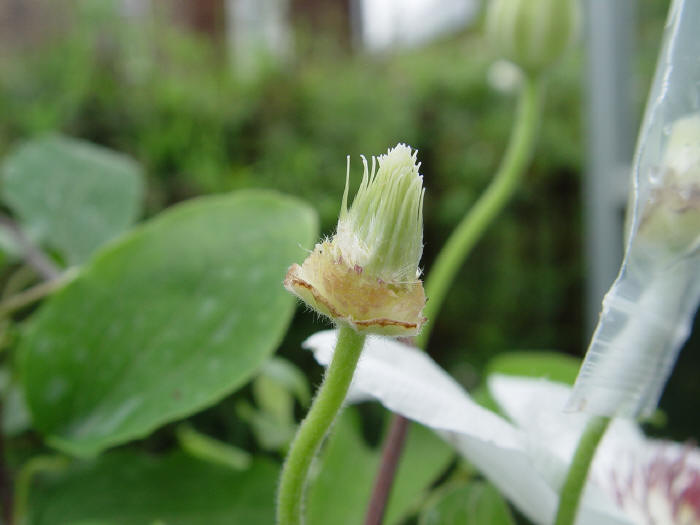
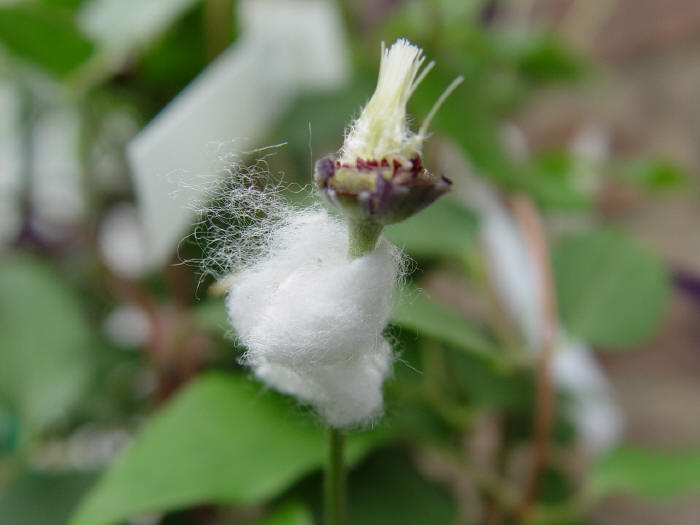
effective - system for cross-pollination; image shows emasculated flower of Madame Edouard
André. The sepals and anthers/filaments removed, leaving the isolated stigmas to await
pollination, when receptive. The stem is bound very lightly with cotton wool, and enclosed
by the top-seal, keeping insects out; a piece of filter paper in the bag (not shown for
clarity) is helpful to trap and channel condensation to the cotton wool to some degree.
It's not a perfect system but it does work well enough to cross clematis of this
type.
You'll have to forgive the state of my rusty "A"-level Biology, from many years ago: The usual meaning of hybridising clematis is the production of seed from one, known, hybrid or species clematis plant, using another, known, clematis plant, to fertilise the flower; this system represents a "deliberate cross".
Alternatively, one can just collect seed from an "open-pollinated" plant at the end of the season, regardless of whether the plant has self-pollinated, or has been pollinated by another, unknown clematis plant, growing and flowering nearby. In both cases seed is the result of "pollination", and its when pollination occurs that genetic change occurs.
In either case the resultant seed must then be germinated, and the plant raised to the flowering stage, in order that one can see the form of the resulting flowers.
The cycle cannot vary: pollination, seed formation, germination, growth, flowers.
This is wholly different from the various vegetative means of reproducing a given plant, by layering, by taking cuttings, grafting, and so forth. These methods increase the numbers of a specific plant, or clone, and do not result in the creation of a new, unique, clone with a different genetic identity. If you take cuttings from C. 'Jackmanii', and allow them to form roots, then put them into pots, you'll get lots of new plants of C. 'Jackmanii'. But they will be copies, identical copies, of the parent plant. All the many millions of C. 'Jackmanii' plants currently in existence have resulted from the vegetative cloning of the first and only unique plant of C. 'Jackmanii' raised from seed sowed in 1858, germinated in Spring 1860, first flowering in 1862, exhibited at the Kensington Flower Show of 1863, and marketed in 1864.
The general term "hybrid" is given to a being, plant or animal, whose characteristics result from a slightly different combination of genes. Hybrids are often (but not always) intermediate in form, because they result from a changed combination of genes (not a blending of specific physical characteristics) from two sources: either (a) the ovary in the female receives pollen from an outside source or (b) the ovary in the female receives pollen from its own anthers.
Not many genes may be different, so the resultant seedlings might be very similar to the parents: or, sometimes, chance may produce a more varied mix, resulting in offspring being markedly different from the parents; the degree of difference can be termed "variation". If you cross two plants that differ markedly in form, you might get plants that resemble one parent more than the other, or plants may be nearer to being "midway" between them in external form.
An animal analogy: take my Son, Richard; well, he's a bit like his mum, and a bit like his dad, but he's not the same as either of us!! He received a new mix of genes at fertilisation, and, because he received a slightly different combination of genes, the physical, outside result is different. But he nevertheless does look a bit like his mum, and a bit like his dad.
Because of all the above, when clematis seeds germinate, they do not (except for species seed) come "true", meaning "true to the parent", in form: they are not an exact copy of the parent(s) which produced them. The ultimate determinant of the visual form of any plant is the DNA within the nucleus of the cells: the physical appearance - the "phenotype" - of the plant, and the appearance of its flowers, are determined by the exact sequences of DNA which make up the genes. The genes are organised into discrete units called "chromosomes", something like beads on a string. When fertilisation - either by self-pollination, or by deliberate cross-pollination - occurs, the genetic sequence - the "genotype" - is changed to some degree. The seeds carry forward the process of genetic change.
The degree of variation depends on several factors, some known, some unknown, so it is impossible to foresee exactly what any resultant new plants will be like. And therein lies the excitement. Given that one can deliberately choose which plants to "cross", one can set about on a programme, in order to investigate the properties of plants resulting from deliberate "hybridisation". Watching your own new, unique clematis come to flower can be very exciting, because, until the actual moment of the opening of the first new flowers, the result is UNKNOWN.
Hybridising "kit"
If you do try your hand at hybridising, you'll want to put together a "hybridising kit".
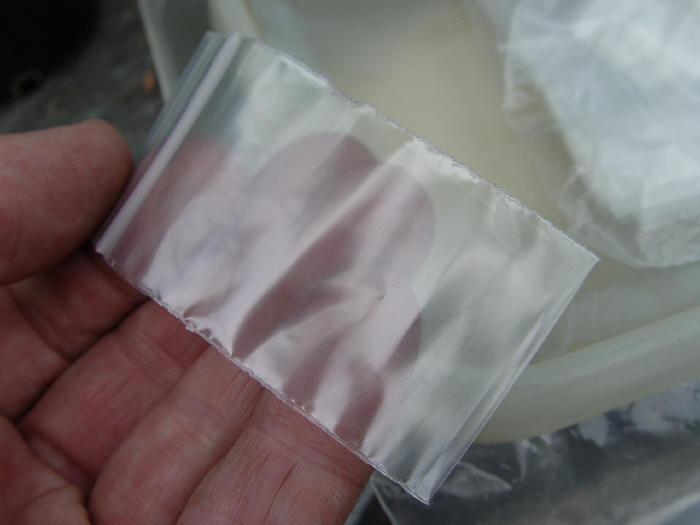
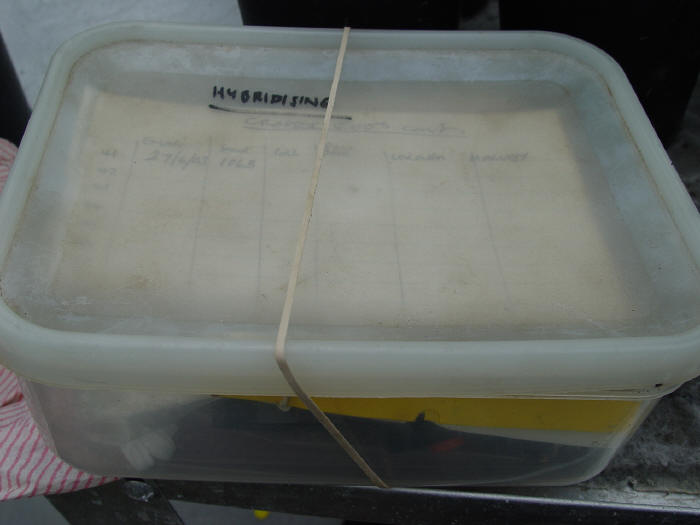
You need; a sealable plastic container, for keeping your things in (see photo below); some small, fine scissors, that enable you to work cleanly and accurately; some cotton wool; some filter paper (or similar); some re-sealable small plastic bags (for isolating) (or non-plastic, perhaps muslin, if you can get, or make, better....see the notes about the type of bags, below, after paragraph number 6.; some plant labels - tie-on's; indelible (..really indelible!) marker pen for labels; a small notebook (and pen) for organising your RECORDS; small envelopes; a quantity of plastic-coated wire twist-ties (handy to anchor flower stems where you want them after pollination); plastic top-sealing bags for individual components or anything that can get wet, for example, notebook, when raining! Not essential but desirable -a smallish, but reasonably strong, magnifying glass is useful, or an eye-lens even better (such as that which a watch-repairer might use).
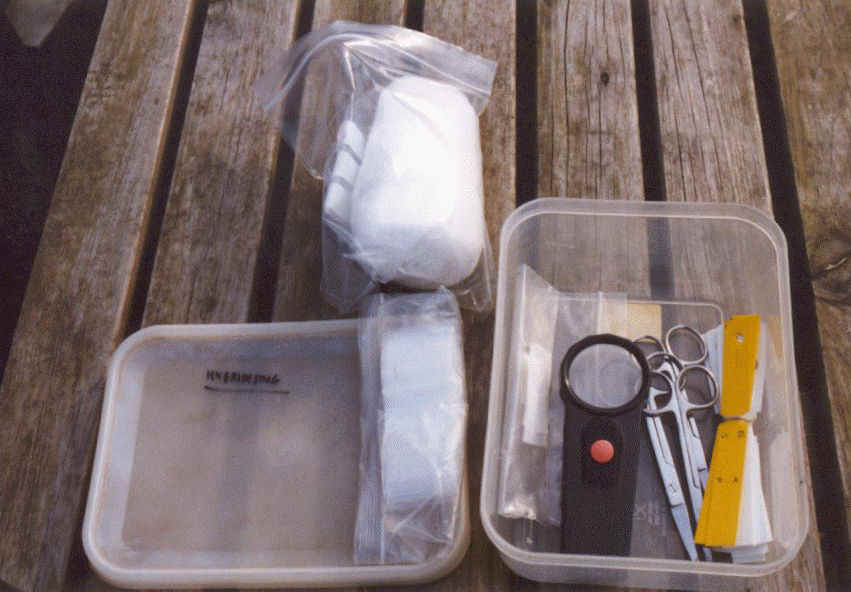
A suitable container
Your records consist of a simple table in your note-book using the following headings:
| Number | Seed parent | Emasculation date | Pollen parent | Pollination date | Uncover date | Harvest date |
A basic method for Hybridising Large-Flowered Hybrid and other Clematis
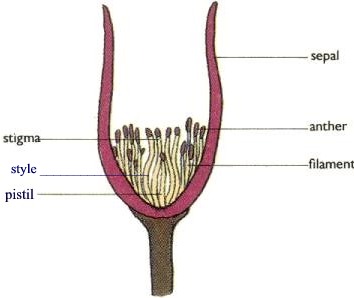
n.b. Stamen = filament, anther, connective. Anthers bear the pollen. Pistil = ovary, style, stigma. Stigmas receive the pollen.
Here is a basic summary for people who want to try for themselves! It isn't so difficult to do. You'll find yourself sowing your own hybridised seed, pretty soon! Get your "kit" ready in advance of doing your crosses; so everything is to hand when required.
Overview of process, with photos
The aim is to transfer viable pollen from the anthers of one plant onto the stigmas of another. No third parties! Fertilisation may then take place.
pollen from plant #1 →stigmas of plant #2 →fertilisation →seed
You remove the stamens of the flower of the seed parent, firstly, so as to prevent 'self-fertilisation'. This is done just before the flower would naturally normally open itself. Because the flower has not yet opened, there is much less chance that fertilisation has already occurred. (In the normal sense, in the garden, as soon as flowers open naturally, insects would be arriving, and carrying pollen, after visiting other flowers previously). You then want to isolate the stigmas which remain, so as to prevent insects, which carry pollen around, from defeating your purpose by introducing foreign pollen. When crossings are done, it might be helpful to know, the "female" parent - the plant on which the seeds are created and nurtured, is known as the "seed parent". The other plant is known as the "pollen parent".
You next need to allow the flower to become receptive to pollen. This usually takes a few days. The books say that when receptive the stigmas secrete a viscous fluid, which can be noticed, but don't count on it, just allow some reasonable time for the flower to become receptive. There is no specific period; its a case of trial and error. One might give the flower two, three, four, maybe more, days, depending on the weather etc. Once pollen is introduced, hopefully nature will take its course.
The pollen attaches to the stigmas and begins to grow into the stigma, forming a pollen tube, down which the male gametes graduate, until they reach the ovaries. A lot of genetics takes place. The pollen gametes hopefully succeed in fusing with the genetic material of the female and the new cell begins to divide and differentiate, until ultimately the seed is formed. Once fertilisation has occurred, the plant becomes indifferent to further pollens, so the isolation-bags can be removed, and the seeds allowed to develop and ripen naturally, until ready for harvest.
Detailed steps
C. florida as seed parent
Just for the sake of convention, let's take the simplest crosses between clematis as being those using two large-flowered hybrids, for example, 'King Edward VII' and 'Joan Picton'. More complex (or adventurous) crosses might include those which involve a cross between a large-flowered hybrid (there are many to choose from!) and a species clematis, for example, one might try 'Joan Picton' crossed with C. texensis pollen. More involved still, a species crossed with another species, for example, C. integrifolia x C. pitcherii.
Some types of clematis are in fact incompatible as breeding partners. But a very large number will cross successfully. Many, many, combinations remain as yet untried. But there are only ever minor differences of detail, in terms of how the crosses would be manually performed. So once you have completed one type of cross, there is no particular further technique to learn, when expanding the range of crosses made. So whatever the pair of (compatible) plants, the practical process described below will suffice in very nearly every case.
The first batch of pictures involve a cross using C. florida as the seed parent, and C. viorna as the pollen parent. That is to say, C. florida receives pollen from C. viorna. There are some pictures using a large-flowered hybrid as seed-parent lower down, as further examples.
1. Decide on the seed parent:
 in this case, C. florida species. You only need one flower for each cross, hopefully you'll have a good, vigorous plant,
with plenty of buds to choose from:
in this case, C. florida species. You only need one flower for each cross, hopefully you'll have a good, vigorous plant,
with plenty of buds to choose from:
2. Decide on the
pollen parent:
 in this case, C. viorna species.
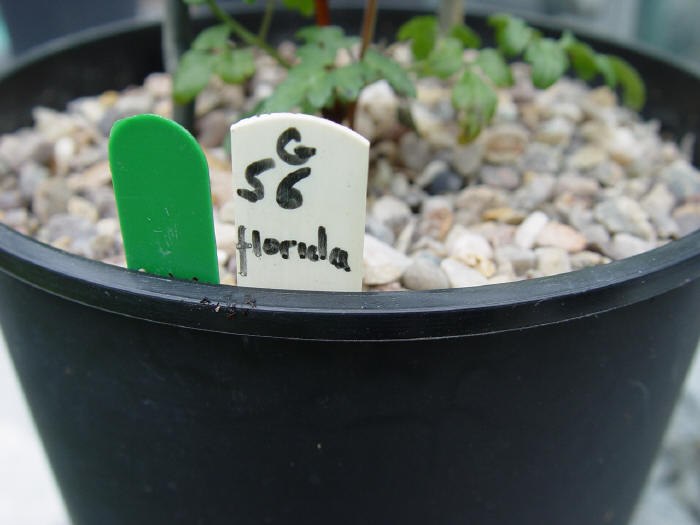
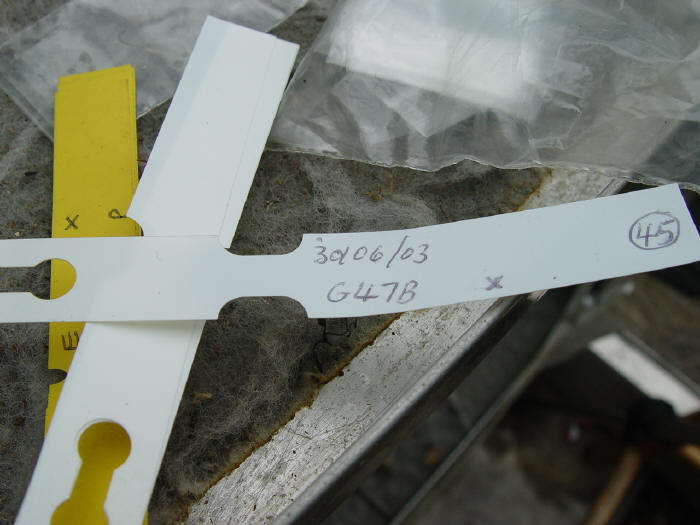
3. Produce a label bearing the details of the intended
cross - dates and plant identifications. A standard system, so you do the same
every time, is useful, for clarity. One system is:-(you can change the
particular 'code letters' you use, to suit yourself, as long as you record the
four key facts): Have the labels already marked E; S; X; P; instead of plant
names, use plant identification numbers - it's easier, (especially if you
are doing crosses on plants outside as opposed to in the greenhouse) in
imperfect weather conditions, faster, and takes less space, as follows:
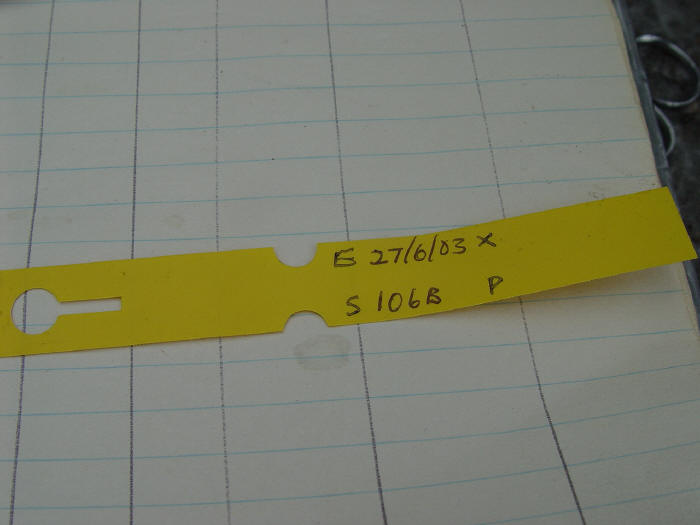 On the label, as each stage is completed, record:
1. Emasculation date E; 29th May 2001
2. Pollination date X; 4th June 2001
3. Seed parent S; Plant 67 = Joan Picton (a large-flowered hybrid)
4. Pollination parent P; Plant 28 = C. pitcherii (a species from the viorna subgenus)
So a label might read: E:29/5/01 X:4/6/01 S:67 P:28 :- which means that plant 67, Joan Picton, was pollinated (that is, received pollen) on the 4th June, by plant 28, C. pitcherii, (that is, C. pitcherii supplied the pollen), having been emasculated (and isolated within a bag) on the previous May 29th.
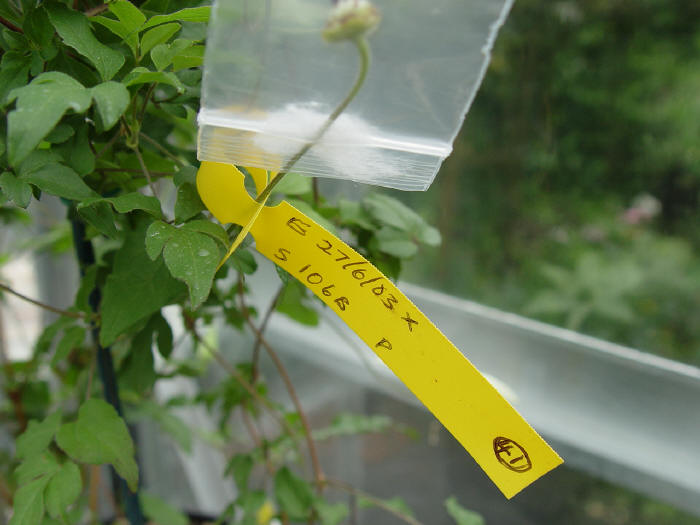
Attach the label to the chosen
flower, on the chosen seed-parent plant, around the flower stalk.
 That's dried anti-fungal wash you can see on the leaves.
Record the details also in your notebook, as per the headings given
above.
 You can't remember it all - so put it in writing.
Number each cross done. Make sure your records are right every time - double-check every entry.
You'll want to look back at what you did last year, and when; so records are, or will
develop, great value. Your records are key.
 The records go straight to the computer, from the notebook.
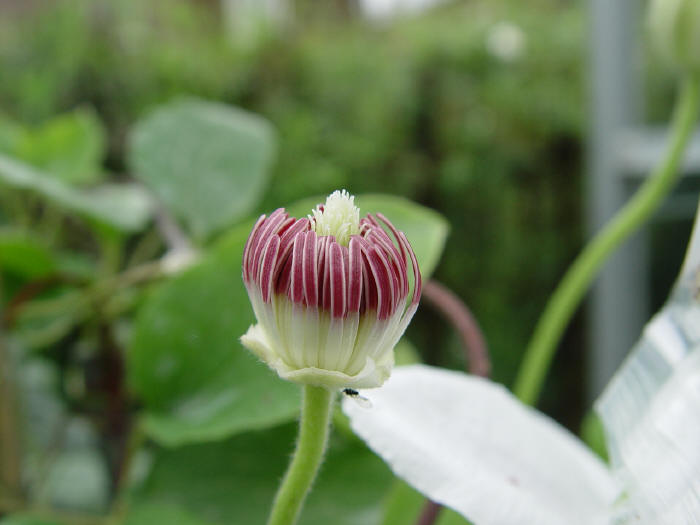
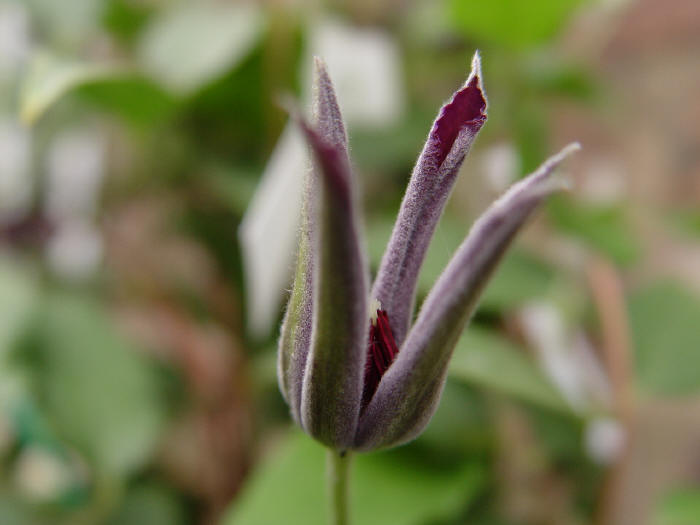
4. On the seed parent you need a flower
which is almost, but not quite, opening.
 Here's a close-up:
Here's a flower bud which is ready to open; I
have just popped a bag around it, to keep insects excluded from the flower,
for a few hours, prior to getting the hybridisation process completed later in
the day, when time permits.

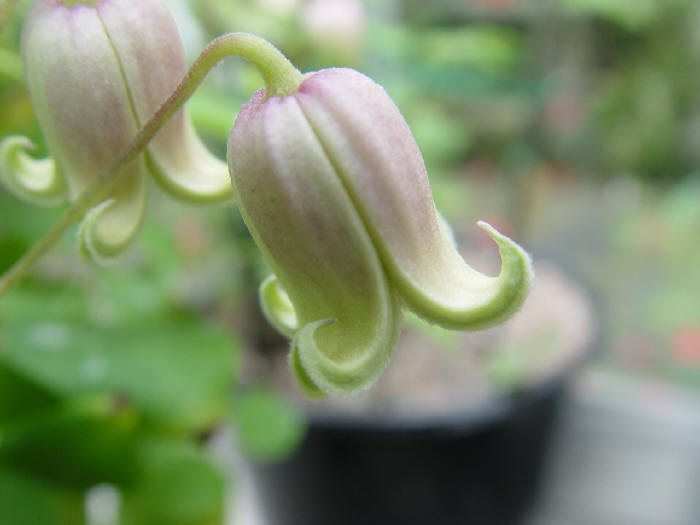
The normal development sequence
of the flower, were it to be left to complete its natural cycle
on the plant, would be as follows: Flower begins to open
 Stamens are still tightly bound together and no pollen at all is visible
 Flower opens fully and the characteristic white of C. florida rapidly
'bleaches-in' - a sight to behold! Pollen is just about beginning to be visible
on the anthers, though none, or little, has yet been shed.
Flower opens fully and the characteristic white of C. florida rapidly
'bleaches-in' - a sight to behold! Pollen is just about beginning to be visible
on the anthers, though none, or little, has yet been shed.
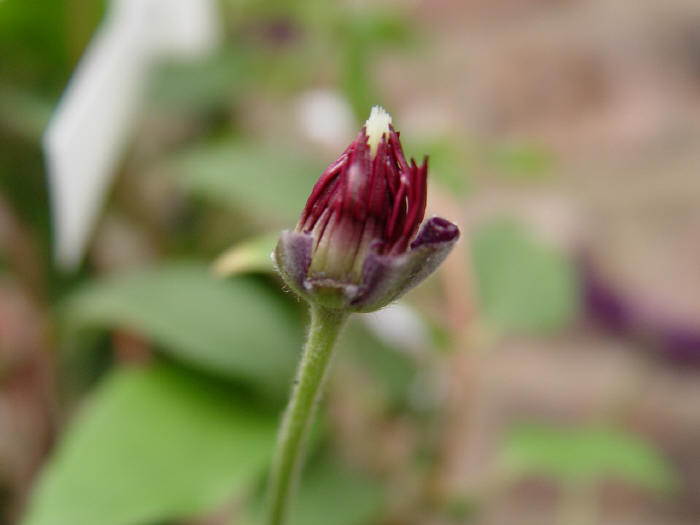
 In due course, as the flower matures, the anthers fully unfurl and begin to shed
pollen, which can be clearly seen, onto the white sepals, below:
In due course, as the flower matures, the anthers fully unfurl and begin to shed
pollen, which can be clearly seen, onto the white sepals, below:
 At this time, 'self-pollination' (pollination of the flower by its own
pollen) would probably normally occur; however, we do not want the flower to
self-pollinate, because we are going to introduce 'foreign' pollen, from another
floral source,
in order to achieve 'cross-pollination' (pollination of the flower by
pollen from some other individual flower).
At this time, 'self-pollination' (pollination of the flower by its own
pollen) would probably normally occur; however, we do not want the flower to
self-pollinate, because we are going to introduce 'foreign' pollen, from another
floral source,
in order to achieve 'cross-pollination' (pollination of the flower by
pollen from some other individual flower).
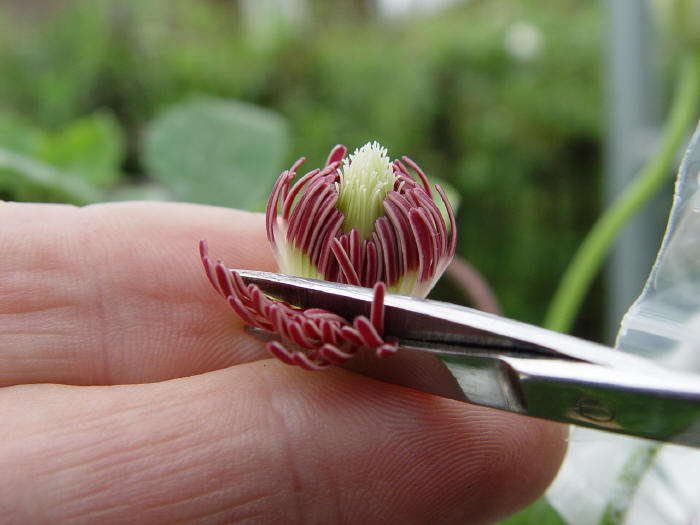
As stated above, we want to remove any chance of self-pollination. Hence we need to remove the flowers' own anthers (and, therefore, pollen source), and isolate it from insects, that may bring in any other 'foreign' pollen in the course of their flower-visiting activities.
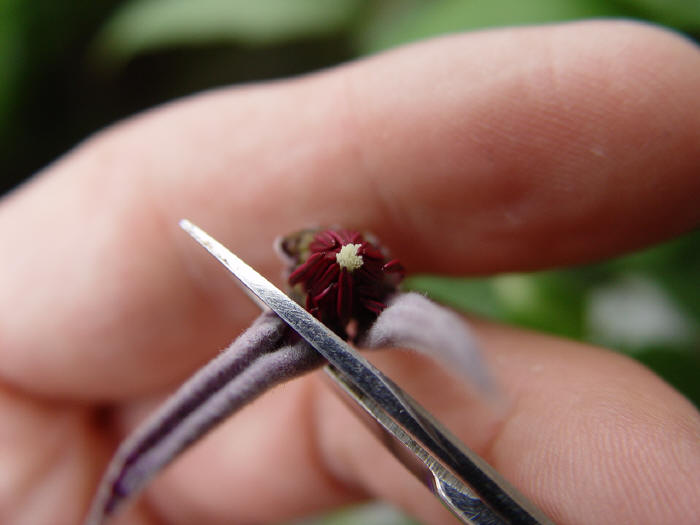
So, take your fine scissors and, firstly,
pull open the sepals of the flower, and then carefully emasculate the flower: that is, remove all the sepals
("petals"):
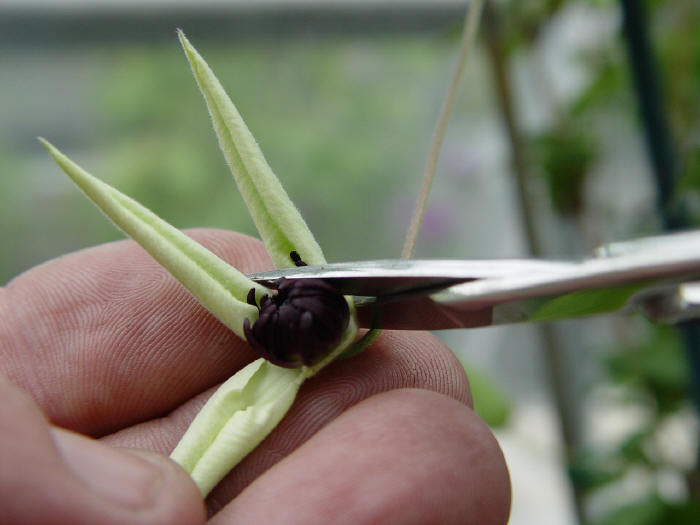 this exposes the inner part of the flower:
 Gently brush back the stamens slightly, so as to get a clearer view:
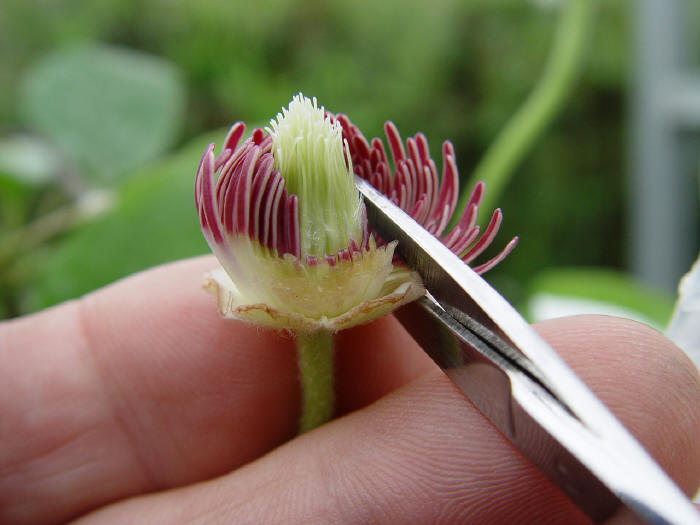
 then with sharp, small scissors, remove the anthers:
 Do it slowly, and go all around the skirt of stamens, being mindful of
cutting-position, and your fingers, before snipping the filaments away:
Do it slowly, and go all around the skirt of stamens, being mindful of
cutting-position, and your fingers, before snipping the filaments away:
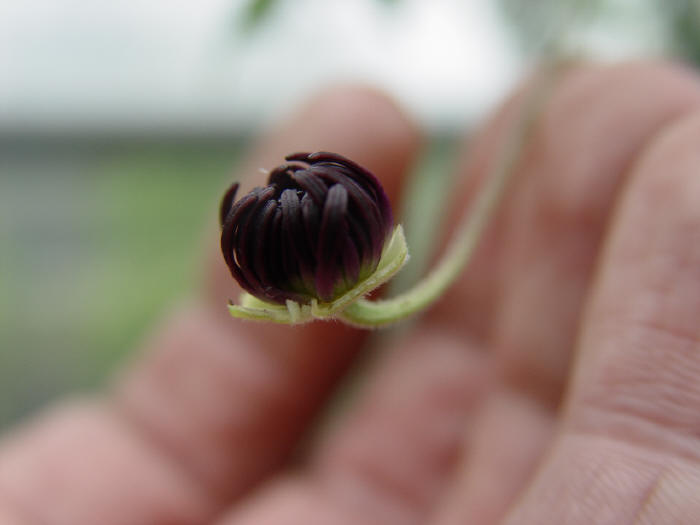
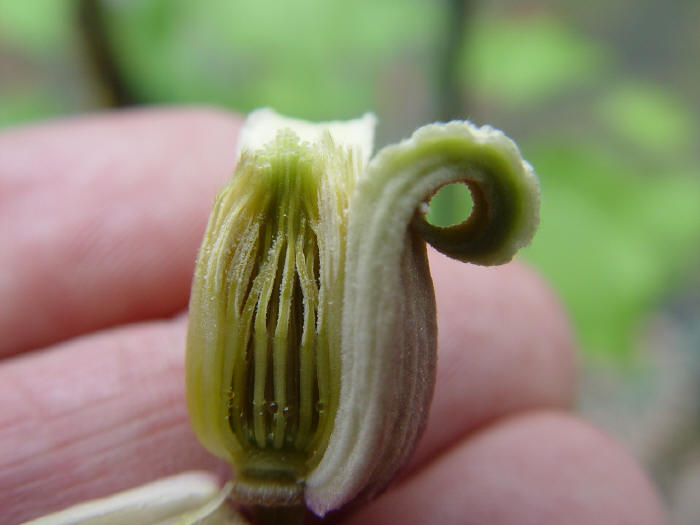
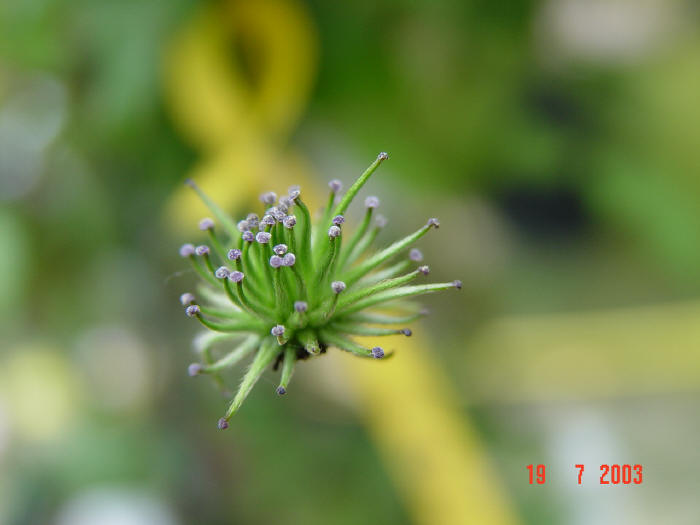
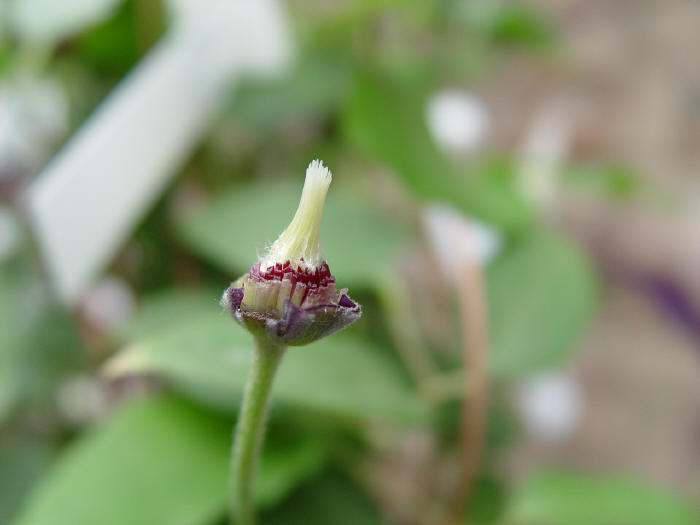
 which will eventually leave you with an emasculated flower, the
filaments completely removed, right down as near to the base as you can. This leaves
you with just a flower stem (pedicel) carrying only the female reproductive
parts, the pistil:
which will eventually leave you with an emasculated flower, the
filaments completely removed, right down as near to the base as you can. This leaves
you with just a flower stem (pedicel) carrying only the female reproductive
parts, the pistil:
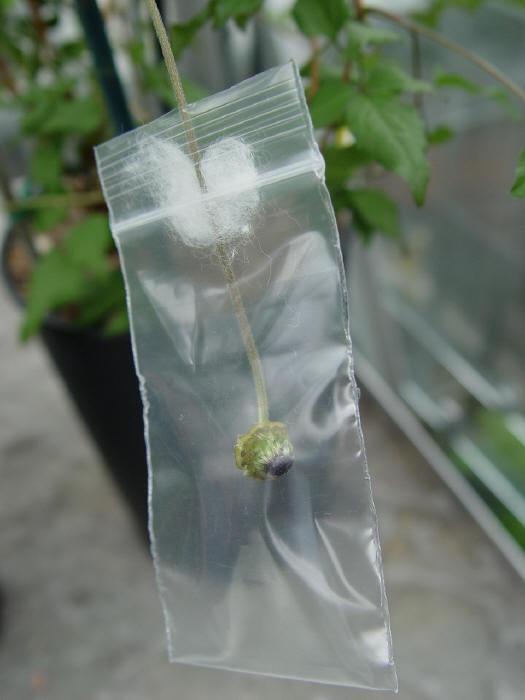
A note on the type of bags to use. The compromise of available materials.
For amateurs. Use a small bag to isolate the flower head. In an ideal world, one might choose to use a light cloth/or other material bag, which could be drawn shut, at the base, around the flower stem. The bag should permit free circulation of air, and allow evaporation away, of water vapour; but would definitely exclude insects. However in practise you may not be able to easily locate the ideal type of isolation bag.
Plastic bags
are not ideal, but can be pressed into service quite reliably, and are
easily and cheaply obtainable in the required size and quantity. The required
bags have a seal at the top, this is sufficient to 95% isolate the flower.
A complete 100% seal around the stem is obtained by utilising a cotton wool 'plug' - see the pictures - in addition, some air and condensation-passage is permitted.
The bags, when on the plant, must be screened from the sun's direct rays; sealed in, while exposed to a hot environment, the emasculated flower will quickly die; in addition, a good deal of condensation will quickly build up, and the emasculated flower will rot. So, once in use, ensure the hybridised flower is always well protected from the sun's rays. Always store 'breeding plants', which are usually in pots, in the more-shaded area of the greenhouse or garden. If fertilising a plant growing in the open garden, try to pick flowers which are screened by foliage, or introduce a physical barrier, to block out the sun's direct rays.
The hybridisation process involves the bags being in place for about a week or so. The plants can tolerate the plastic bags for several days before fertilisation, and several days after - enough time to get the job done. Once the (approximately) week is over, the bag is no longer needed and can be discarded immediately. This is because the flower, once fertilisation has taken place, becomes indifferent to further pollens, and therefore no longer needs isolating. Once the bags have been discarded, the chance of damaging the parent flower, or flower stem, or of completely losing the flower, is mostly past.
So although plastic bags are not ideal, they are good enough for the purpose, most of the time. They will allow isolation of the stigmas for the necessary time, prior to pollination, and then further isolation for a few days or so, after pollination. It's not perfect, but in my experience it works most of the time. If you can get better bags, then please let me know!
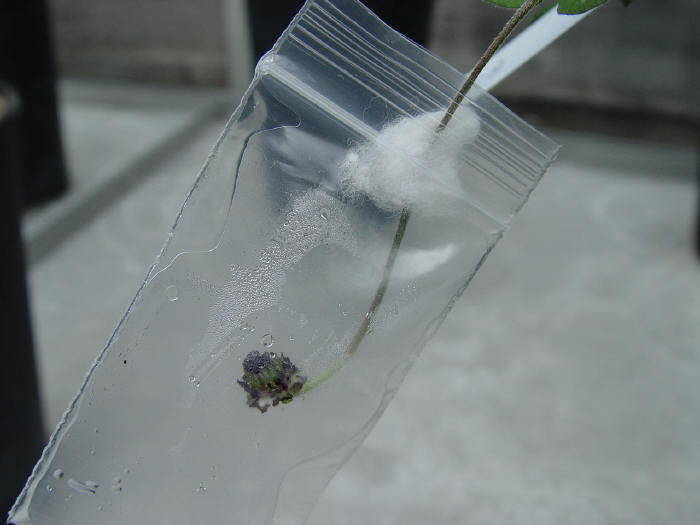
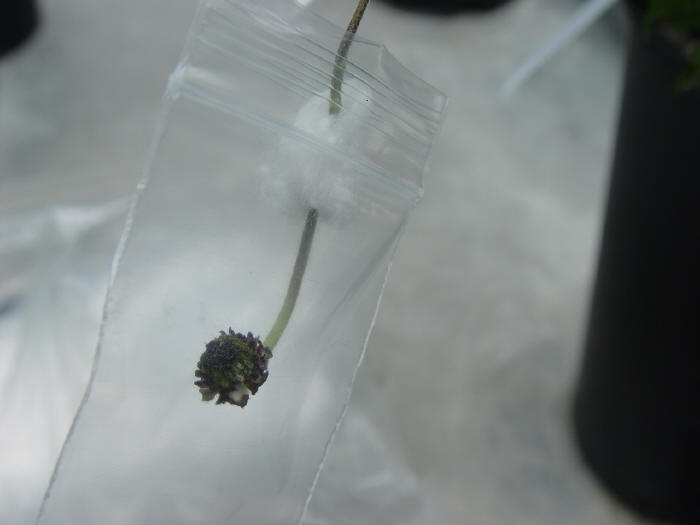
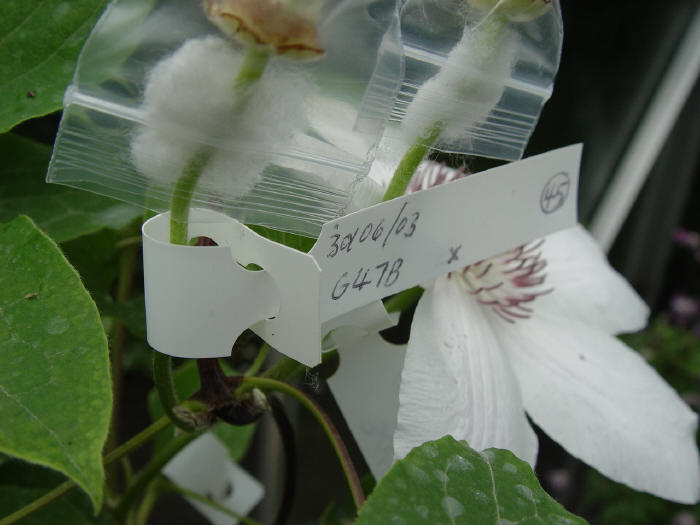
6. Wrap a whisp
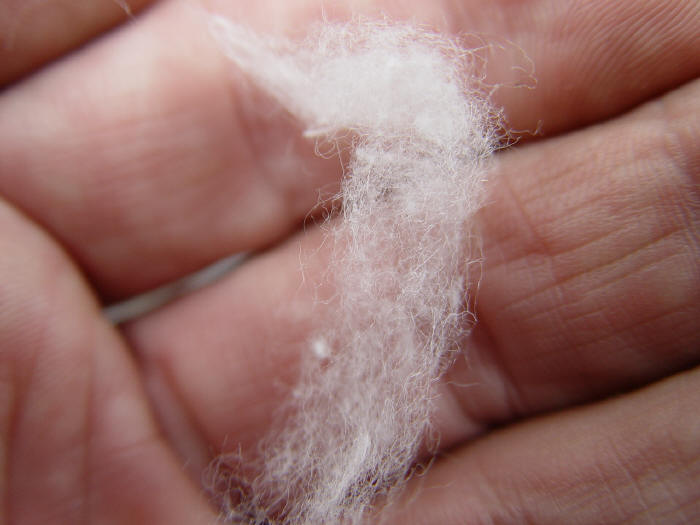 of cotton wool around the stem
 a centimetre or two below the emasculated flower.
First (optional) insert a small piece of filter paper in the bag, then carefully
coax/introduce the flower head into the bag, then seal, at the base of the bag - the now-lowest part of the bag. Seal around the cotton wool,
wrapped lightly around the stem (filter paper omitted, to show seal).
a centimetre or two below the emasculated flower.
First (optional) insert a small piece of filter paper in the bag, then carefully
coax/introduce the flower head into the bag, then seal, at the base of the bag - the now-lowest part of the bag. Seal around the cotton wool,
wrapped lightly around the stem (filter paper omitted, to show seal).
 After a few tries you'll get it right every time! It's easy even for someone as
ham-fisted as me!
After a few tries you'll get it right every time! It's easy even for someone as
ham-fisted as me!
Use a wire-tie to keep the stem and bag in the position you want them to be - stable, out of direct sun, upright, easy to reach and manipulate. You really do want to keep them out of the sun; minimise direct sunlight. In most cases the flower-heads will stay the course required even with these imperfect materials, as long as they're out of the sun. During the next two or three days, any remaining parts of the filaments usually die off and fall away from the flower, into the bag. This 'detritus' will be removed when you get to the fertilisation stage, at which point you will replace the old bag with a new bag.
Note everything in your records. Put everything
neatly away, until it is time to proceed to the next stage.
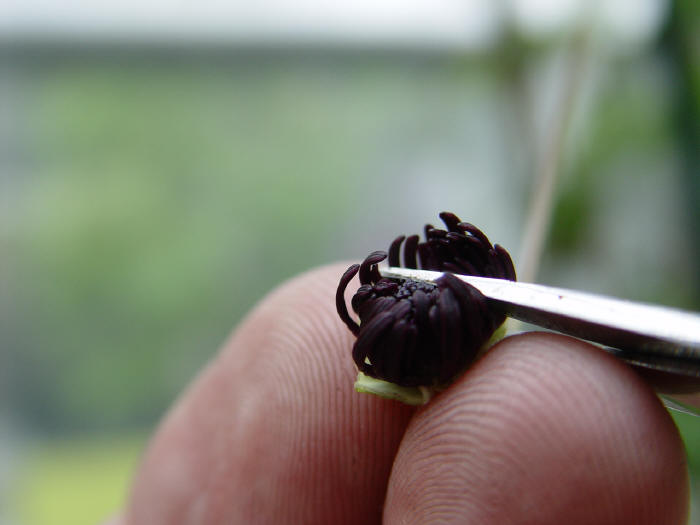
7. When the time is right, after a few days,
 get ready to introduce the pollen.
Choose a
flower which is displaying a goodly amount of pollen, (which you can see if you look closely
- pull a sepal away if necessary -; this flower is ok, but there's not too much
pollen left, most of it having already fallen away - that is, the flower is too
old
 whereas this one
 is absolutely laden with pollen)
If the flower is just right, a tap of the stem, or a sharp blow of air, will cause pollen to be released in a swirl.
Snip off the flower and take it to the
emasculated flower. Remove the old bag (and any condensation) if not already
done,
and the cotton wool from the previously-emasculated seed-parent flower;
shake the pollen from the pollen-flower onto the stigmas of the other.
 Ensure a thorough delivery.
 Then put
fresh
cotton wool
properly back in place
Then put
fresh
cotton wool
properly back in place
 and finally re-enclose the pollinated flower-head,
(with a new piece
of filter paper, if being used) in a new, dry bag
and finally re-enclose the pollinated flower-head,
(with a new piece
of filter paper, if being used) in a new, dry bag
 around the new whisp of
cotton wool wrapped around the stem:
around the new whisp of
cotton wool wrapped around the stem:
8. Allow some time for fertilisation to take
place. Again a matter of trial and error; you might leave it maybe three, four,
five or more days, before removing the bag. Carefully unseal and slip the bag
away:
 Keep the label in place.
Record actions in the notebook, so as not to forget any important details. Your
records will be invaluable next year and beyond. A frequent recommendation is to go
back and re-pollinate the plant, to "make sure", using the same pollen-source a
day or two later; that's ok, if you have the time and inclination!
Keep the label in place.
Record actions in the notebook, so as not to forget any important details. Your
records will be invaluable next year and beyond. A frequent recommendation is to go
back and re-pollinate the plant, to "make sure", using the same pollen-source a
day or two later; that's ok, if you have the time and inclination!
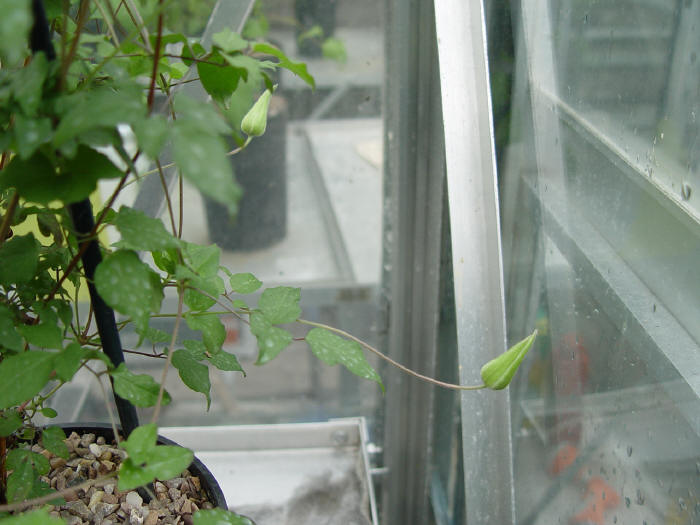
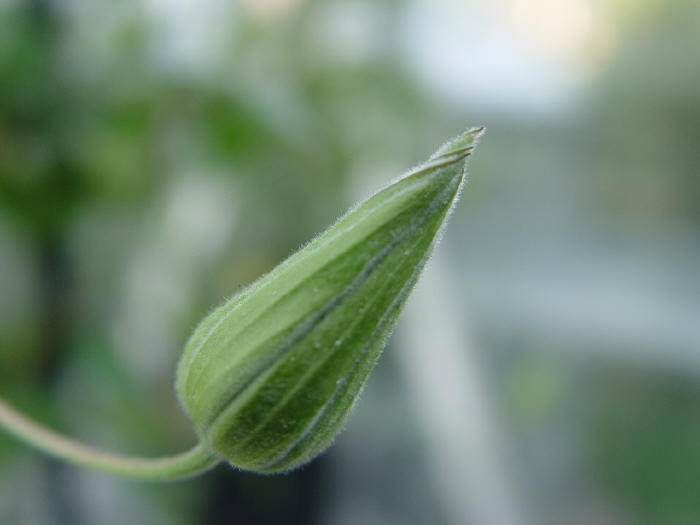
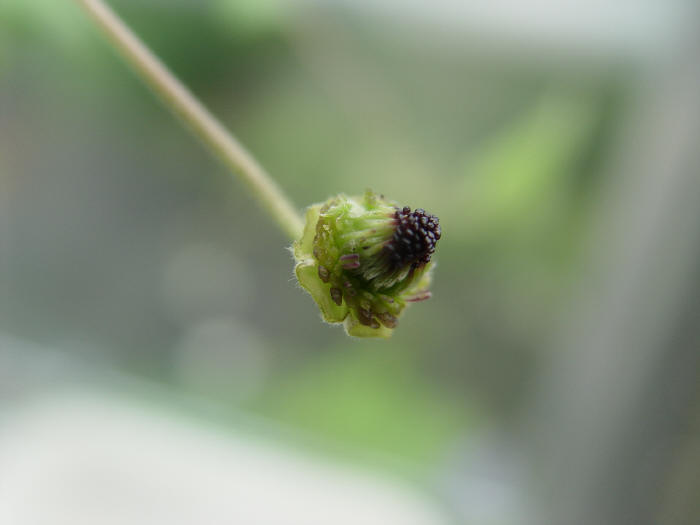
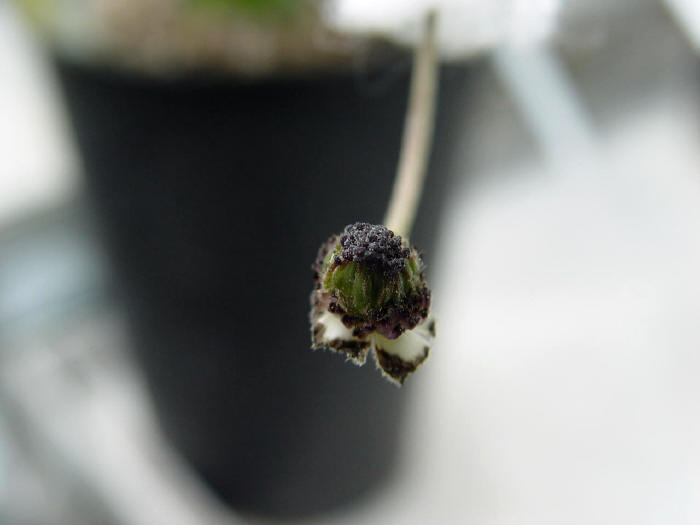
9. If things have gone well, allow the seeds to develop:
 Make sure the labels are ok each time
 you check, as the maturation process begins:
Await full ripening. See the seed formation pictures below.
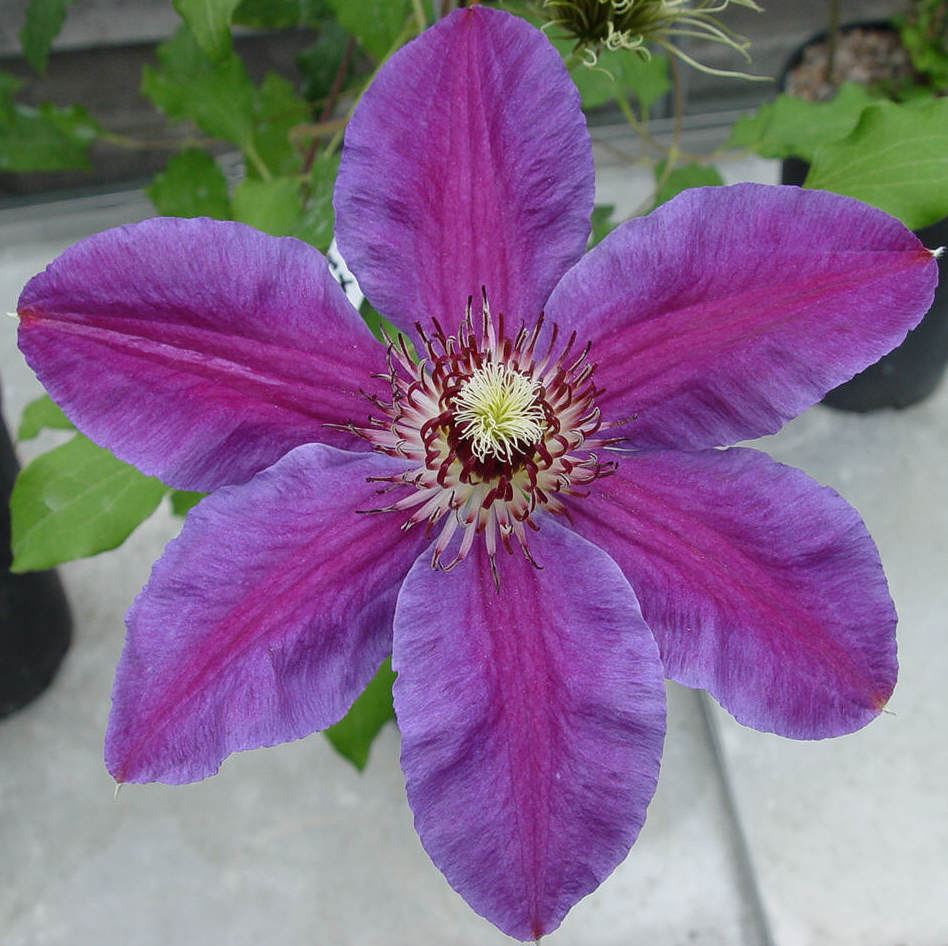
Sequence using a new white large-flowered hybrid as seed parent.
Identify the plant to be used as
seed parent,
 and select the unopened flower that will be emasculated:
 This one, spotted as being ready, earlier, has been temporarily enclosed
in a clean plastic bag to prevent insects bringing pollen in
This one, spotted as being ready, earlier, has been temporarily enclosed
in a clean plastic bag to prevent insects bringing pollen in
 prior to hybridisation - small chance, but possible! Here's another flower on
the same plant, which has been left to go through the normal flowering cycle,
the next stages:
prior to hybridisation - small chance, but possible! Here's another flower on
the same plant, which has been left to go through the normal flowering cycle,
the next stages: 


So the flower must first be emasculated..
 by
first pulling open and removing all the sepals
by
first pulling open and removing all the sepals
 then the anthers and stamens

 finally ending up with the emasculated flower with the female parts only
 after which it takes one moment only to make out the label
 and attach it
 and then complete your records
 after which pollination can in due course be carried out.
Sequence using a new purple large-flowered hybrid as seed parent.
Pull the flower open and remove the
sepals and stamens, wrap and isolate:
 ready for fertilisation in a few days.
Possible problems? Three main points to be aware of: 1. guard against damaging the flower stalk itself, while handling the process - the cotton wool seal around the stalk usually does no damage, but occasionally it will leave a dark mark on the stem - but so long as there is no stem breakage, seeds will normally mature in the usual way. 2. Keep the bags on for the correct time period, NO LONGER. You don't want to encourage any rotting of the flower head. Rotting will only happen if moisture builds up, and the flower is left untended, for days longer than necessary. 3. Keep the flower/bag OUT OF DIRECT SUN. Allowing the bag-contents to linger in direct sunshine will accelerate the rate of decomposition of the emasculated flower.
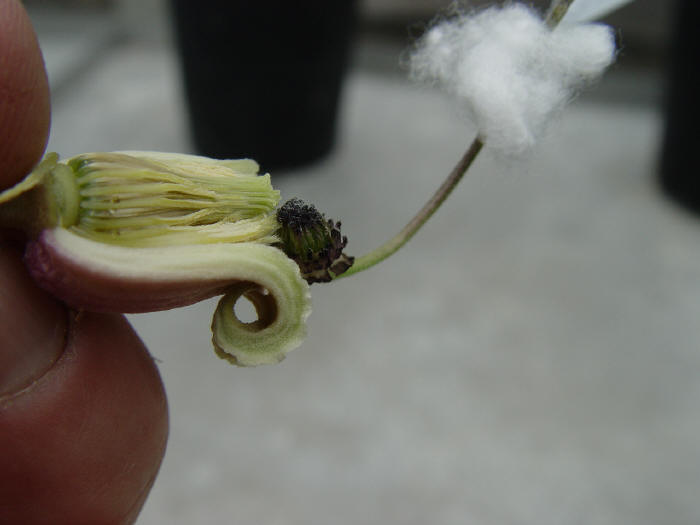
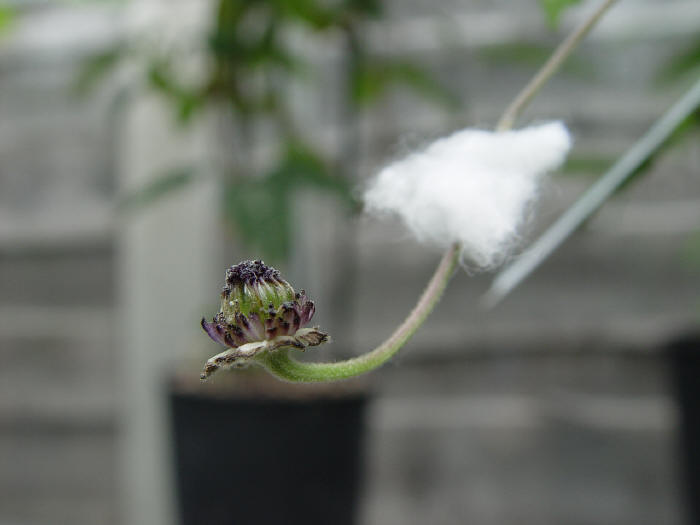
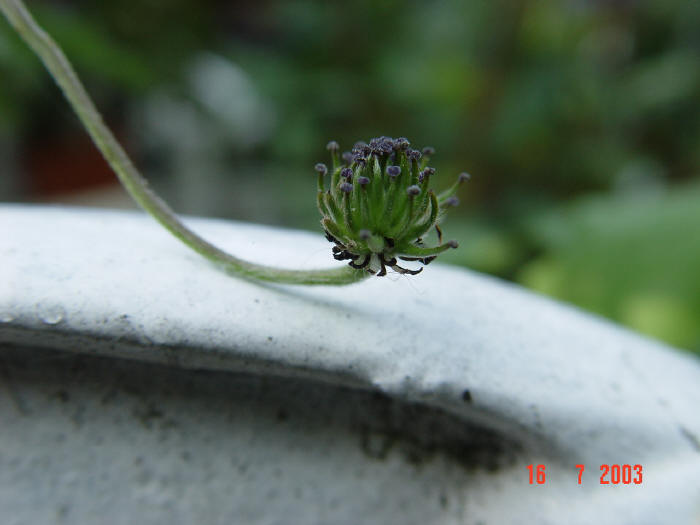
Seed formation, after fertilisation: next batch of photos, to follow.
Hopefully, your new seeds each have an embryo with a novel genetic mix. During formation of the pollen and the ovules, genetic information becomes slightly changed or re-arranged; on fusion of the resulting sex cells, that is, after fertilisation, a seed containing cells with the normal number of chromosomes results, but with a different genetic identity. The physical characteristics of a plant are ultimately determined by the plant's genes; therefore your seeds will produce plants that differ, to a greater or lesser degree, from the parents which gave rise to them. Those fantastic, new, exciting flowers are the expression of just a few genes from within the whole mix.
You'll have successes and failures; immediately pot-up any resultant seeds, and then get them exposed to Winter's cold!
*
The following are the crosses made and the outcomes; the plants involved are identified by the key in the next table.
| Number | Seed parent | Emasculation date | Pollen parent | Pollen date | Uncover date | Seed harvest date |
| 1 | G75C | 29-04-04 | P176 | 01-05-04 | 03-05-04 | 26-07-04 |
| 2 | G75A | 08-05-04 | P176 | 11-05-04 | 14-05-04 | 26-07-04 |
| 3 | Suzymac | 08-05-04 | P176 | 13-05-04 | 14-05-04 | Failed |
| 4 | G74D | 10-05-04 | P176 | 11-05-04 | 14-05-04 | 28-09-04 |
| 5 | G95A | 01-07-04 | G55A | 05-07-04 | 06-07-04 | Failed |
| 6 | G75A | 04-07-04 | P176+106B | 05-07-04 | 07-07-04 | 17-08-04 |
| 7 | G75A | 05-07-04 | G48C | 05-07-04 | 07-07-04 | 17-10-04 |
| 8 | G100R | 06-07-04 | G101 | 07-07-04 | 12-07-04 | Failed |
| 9 | G100R | 06-07-04 | G55A | 07-07-04 | 12-07-04 | Failed |
| 10 | G95A | 08-07-04 | G48C | 12-07-04 | 13-07-04 | Failed |
| 11 | G73F | 20-07-04 | SD1 | 22-07-04 | 23-07-04 | 28-10-04 |
| 12 | G65D | 21-07-04 | SD1 | 22-07-04 | 26-07-04 | 24-10-04 |
| 13 | G47M | 22-07-04 | SD1 | 26-07-04 | 28-07-04 | Failed |
| 14 | G65D | 24-07-04 | SD1 | 26-07-04 | 28-07-04 | 28-10-04 |
| 15 | G47M | 01-08-04 | P178 | 03-08-04 | 07-08-04 | Failed |
| 16 | G47M | 01-08-04 | P192 | 04-08-04 | 07-08-04 | Failed |
| 17 | G47M | 01-08-04 | G99 | 04-08-04 | 07-08-04 | Failed |
| 18 | G47M | 01-08-04 | P181 | 04-08-04 | 07-08-04 | Failed |
| 19 | G73F | 02-08-04 | P181 | 04-08-04 | 06-08-04 | 03-11-04 |
| Number | Seed parent | Emasculation date | Pollen parent | Pollen date | Uncover date | Seed harvest date |
| 20 | G47M | 02-08-04 | G87 | 04-08-04 | 07-08-04 | Failed |
| 21 | G95B | 02-08-04 | SD1 | 04-08-04 | 07-08-04 | Failed |
| 22 | G95B | 03-08-04 | G101 | 04-08-04 | 07-08-04 | 24-10-04 |
| 23 | G47M | 03-08-04 | Lady Di | 04-08-04 | 07-08-04 | Failed |
| 24 | G47M | 04-08-04 | G106B | 07-08-04 | 08-08-04 | Failed |
| 25 | G95B | 05-08-04 | SD1 | 08-08-04 | 09-08-04 | 24-10-04 |
| 26 | G95B | 05-08-04 | P178 | 08-08-04 | 09-08-04 | 24-10-04 |
| 27 | G95B | 09-08-04 | P204 | 10-08-04 | 11-08-04 | 24-10-04 |
| 28 | G95B | 09-08-04 | P168 | 10-08-04 | 11-08-04 | 25-10-04 |
| 29 | G95B | 09-08-04 | P181 | 10-08-04 | 11-08-04 | 24-10-04 |
| 30 | G95B | 09-08-04 | P178 | 10-08-04 | 11-08-04 | 24-10-04 |
| 31 | G65D | 09-09-04 | G87 | 10-08-04 | 11-08-04 | 03-11-04 |
| 32 | G75C | to follow | G55A | to follow | to follow | 24-10-04 |
| 33 | to follow | |||||
| 34 | to follow |
Key to plants in above table
Used as seed parent, and comments Used as pollen parent, and comments
| G75A | raised as C. patens, white | P176 | C. coactilis species |
|
G75C |
raised as C. patens, white | G55A | C. texensis species |
|
Suzymac |
extremely floriferous large-flowered hybrid, purple | G87 | C. campaniflora species |
| G74D | raised as C. patens, blue, pale bar | G48C | C. florida species, flat sepals |
| G95A | large-flowered hybrid, very large flower, bluish | G101 | seedling of C. 'Joan Baker' |
| G73F | large-flowered hybrid, very large flower, bluish | SD1 | C. texensis species very dark red form |
| G65D | large-flowered hybrid, very large flower, striped, lovely | P178 | Beautiful C. pitcheri hybrid |
| G47M | Large-flowered hybrid, very floriferous, white | P192 | C. glaucophylla/C.versicolor hybrid? |
| G95B | Large-flowered hybrid, very floriferous, stunning purply-mauve | P181 | C. texensis species small pink form |
| Lady Di | The Princess of Wales | ||
| G106B | C. florida species, wavy sepals | ||
| P204 | C. glaucophylla/C.versicolor hybrid? | ||
| P168 | C. integrifolia var. latifolia | ||
| G99 | new blue C. viticella hybrid |
Comments:
The seed yields this year have been the best ever, producing several hundreds of seeds in total. All sowed by 31-10-2004. This year's failures were mainly due to a (damn!) broken main vine on seed-parent G47M, otherwise most crosses this year produced promising-looking seed.
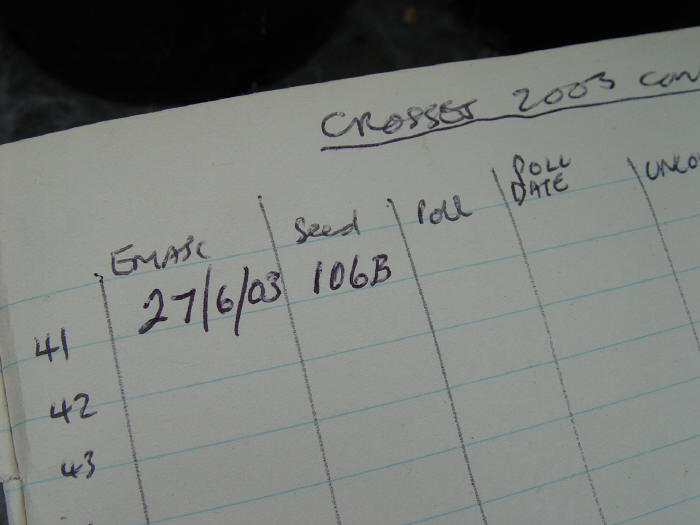
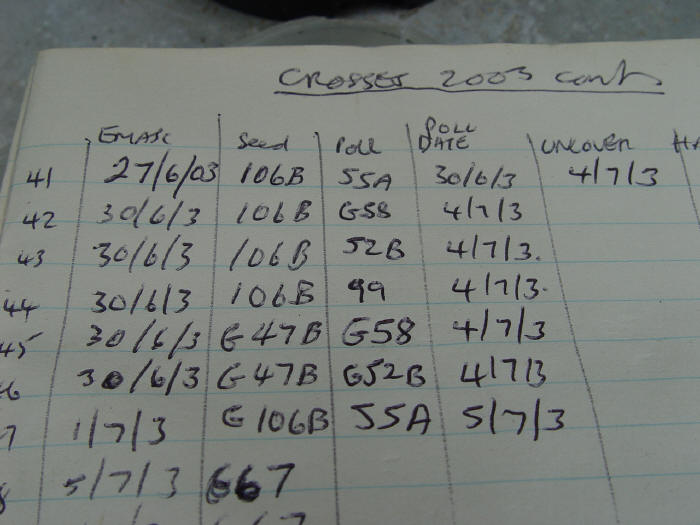
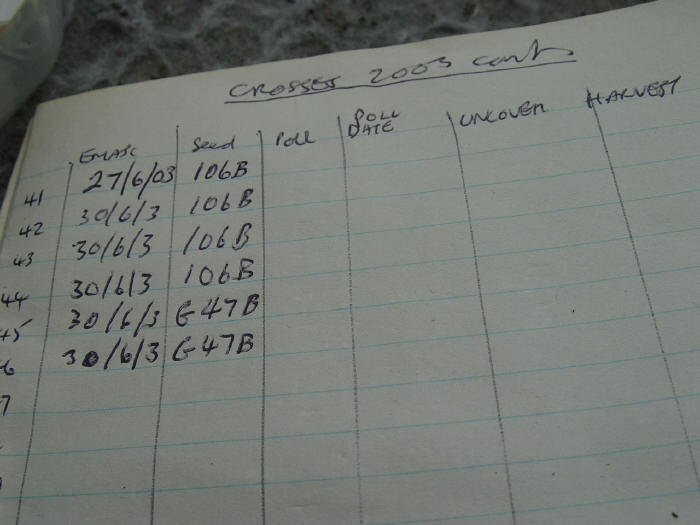
Hybridisation attempts so far; Summer 2003
| No. | Emasculation date | Seed | Pollen | Poll date | Uncover | Progress at 21st July |
Harvest date |
| 1 | 14/06/03 | 56 | G55A |
19/06/03 |
23/06/03 | plant lost | |
| 2 | 14/06/03 | 56 | G61B | 19/06/03 | 23/06/03 | plant lost | |
| 3 | 14/06/03 | 56 | G52B | 19/06/03 | 23/06/03 | plant lost | |
| 4 | 14/06/03 | 56 | G76I | 19/06/03 | 23/06/03 | plant lost | |
| 5 | failed! |
failed! |
|||||
| 6 | 15/06/03 | 56 | G97A | 20/06/03 | 20/06/03 | plant lost | |
| 7 | 15/06/03 | 56 | 176 | 20/06/03 | 20/06/03 | plant lost | |
| 8 | 15/06/03 | 56 | G58 | 20/06/03 | 20/06/03 | plant lost | |
| 9 | 15/06/03 | 67 | G55A | 18/06/03 | 23/06/03 | failed | |
| 10 | 16/06/03 | 56 | G58 | 20/06/03 | 24/06/03 | plant lost | |
| 11 | 16/06/03 | 56 | G99 | 20/06/03 | 24/06/03 | plant lost | |
| 12 | 16/06/03 | 56 | G96 | 20/06/03 | 24/06/03 | plant lost | |
| 13 | 16/06/03 | 67 | G55A | 19/06/03 |
23/06/03 |
failed | |
| 14 | 17/06/03 | 56 | G47B | 20/06/03 | 24/06/03 | plant lost | |
| 15 | 18/06/03 | 56 | G84B | 21/06/03 | 24/06/03 | plant lost | |
| 16 | 18/06/03 | 67 | G76I | 21/06/03 | 24/06/03 | failed | |
| 17 | 18/06/03 | 67 | G61B | 21/06/03 | 24/06/03 | failed | |
| 18 | 18/06/03 | 67 | G58 | 21/06/03 | 24/06/03 | 1 seed | |
| 19 | 18/06/03 | 67 | G97A | 21/06/03 | 24/06/03 | failed | |
| 20 | 18/06/03 | 168 |
G61B  |
20/06/03 | 23/06/03 | seed form'g | 01/9/03 |
| 21 | 19/06/03 | 56 | G55A | 22/06/03 | 25/06/03 | plant lost | |
| 22 | 19/06/03 | 56 | G55A | 22/06/03 | 25/06/03 | plant lost | |
| 23 | 19/06/03 | 67 | G55A | 22/06/03 | 25/06/03 | failed | |
| 24 | 20/06/03 | G66B |
G76I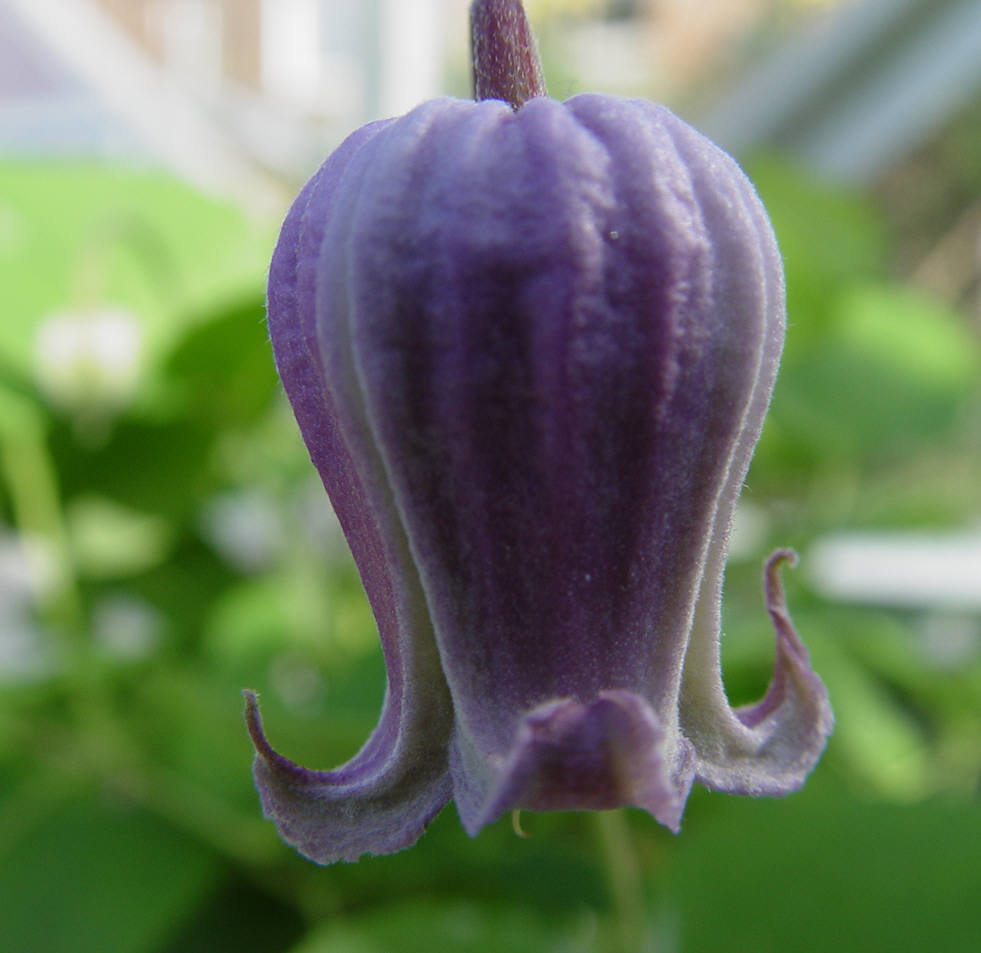 |
21/06/03 | 25/06/03 | seed form'g | 18/10/03 |
| 25 | 20/06/03 | G66B |
G61B |
21/06/03 |
25/06/03 |
seed form'g |
18/10/03 |
| No. | Emasculation date | Seed | Pollen | Poll date | Uncover | Progress | Harvest |
| 26 | 20/06/03 | 67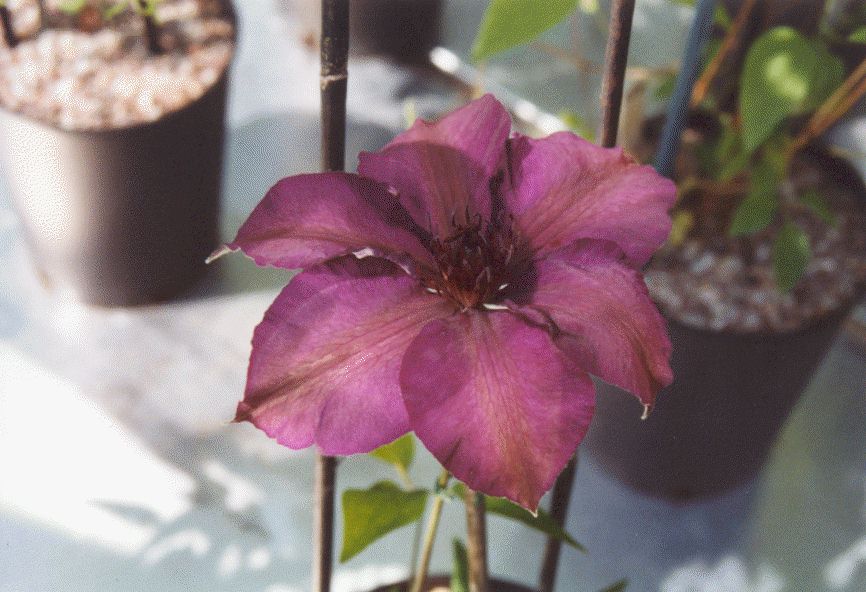 |
168 |
23/06/03 | 26/06/03 | seed form'g | 18/10/03 |
| 27 | 20/06/03 | 67 | G52B | 23/06/03 | 26/06/03 | failed | |
| 28 | 20/06/03 | 67 | G64H | 23/06/03 | 26/06/03 | failed | |
| 29 | 20/06/03 | 67 | JB4 | 23/06/03 | 26/06/03 | failed | |
| 30 | 20/06/03 | 67 | G84B | 23/06/03 | 26/06/03 | failed | |
| 31 | 20/06/03 | 67 |
G99
 |
23/06/03 | 26/06/03 | seed form'g | 18/10/03 |
| 32 | 20/06/03 | failed! |
failed! |
||||
| 33 | 20/06/03 | G95B
 |
G61B |
20/06/03 | at opening | seed form'g | 18/10/03 |
| 34 | 21/06/03 | 67 | G62B | 23/06/03 | 26/06/03 | failed | |
| 35 | 21/06/03 | 67 | G56 | 24/06/03 | 27/06/03 | failed | |
| 36 | 22/06/03 | G66B
|
176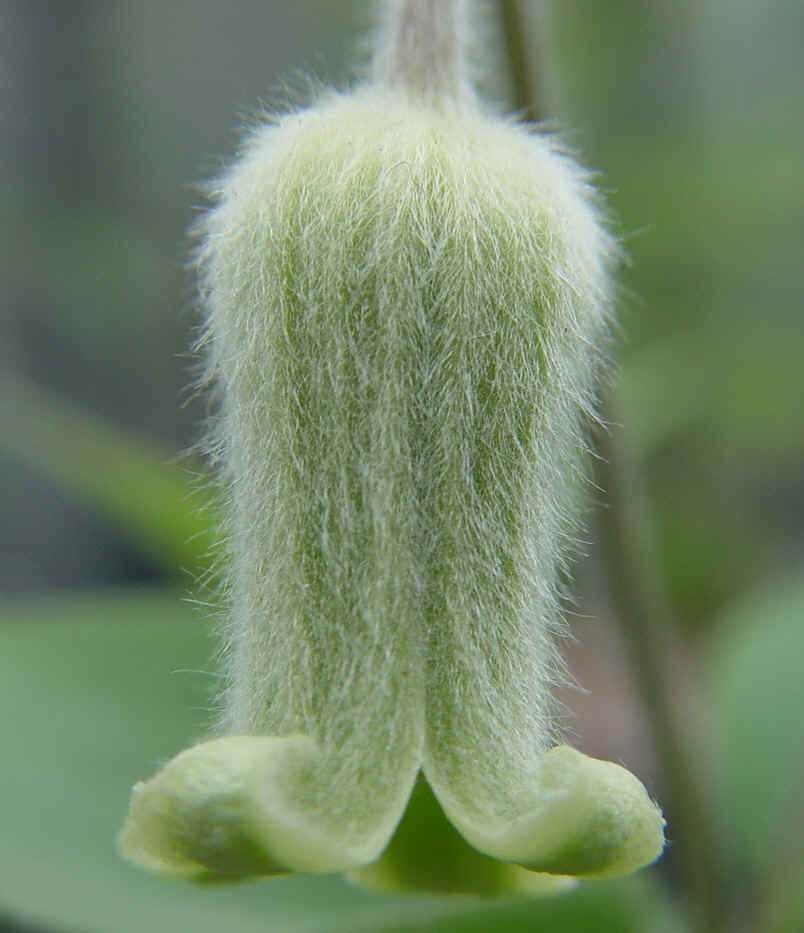 |
24/06/03 | 27/06/03 | seed form'g | 18/10/03 |
| 37 | 22/06/03 | 56 | G58 | 24/06/03 | 27/06/03 | plant lost | |
| 38 | 22/06/03 | Diana How we loved her. |
G58
 |
26/06/03 | 27/06/03 | ? | 18/10/03 |
| 39 | 22/06/03 | Diana | G58 | 26/06/03 | 27/06/03 | ? | |
| 40 | 23/06/03 | G47B |
G55a  |
26/06/03 | 27/06/03 | seed form'g | 20/10/03 |
| 41 | 27/06/03 | 106B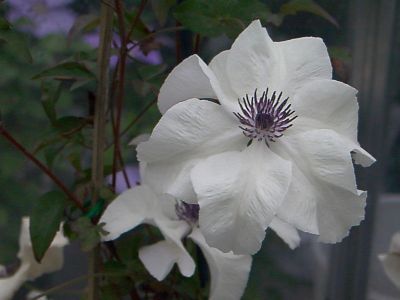 |
G55a |
30/06/03 | 04/07/03 | seed form'g | 01/09/03 |
| 42 | 30/06/03 | 106B |
G58
|
04/07/03 | 07/07/03 | seed form'g | 01/09/03 |
| 43 | 30/06/03 | 106B | G52B | 04/07/03 | 07/07/03 | seed form'g | |
| 44 | 30/06/03 | 106B |
G99 |
04/07/03 | 07/07/03 | seed form'g | 18/10/03 |
| 45 | 30/06/03 | G47B |
G58
|
04/07/03 | 07/07/03 | seed form'g | 01/11/03 |
| 46 | 30/06/03 | G47B | G52B | 04/07/03 | 07/07/03 | seed form'g | |
| 47 | 01/07/03 | G106B |
G55a |
07/07/03 | 10/07/03 | seed form'g | 17/10/03 |
| 48 | 05/07/03 | G67 | G55a | 07/07/03 | 10/07/03 | ? too early | |
| 49 | 05/07/03 | G67 | G55a | 07/07/03 | 10/07/03 | ?too early | |
| 50 | 07/07/03 | G65D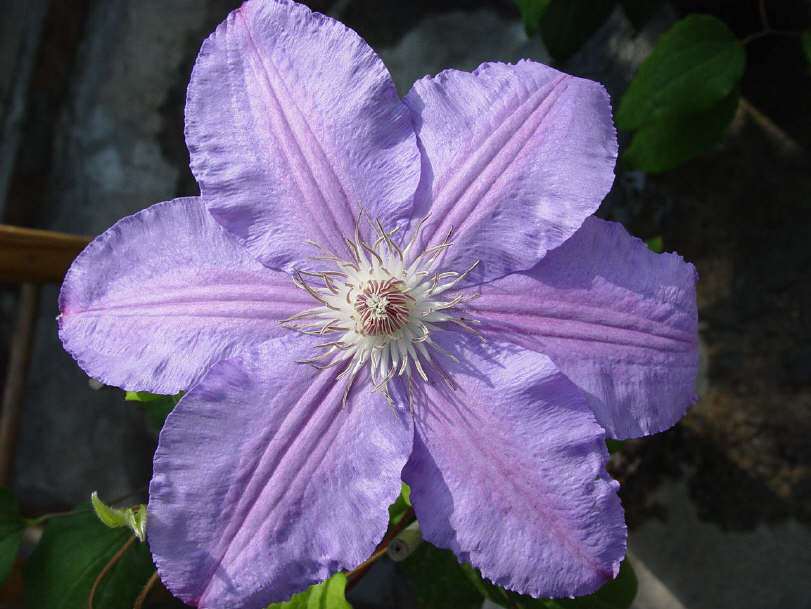 |
G55a |
10/07/03 | 13/07/03 | not sure yet | 18/10/03 |
| 51 | 08/07/03 | G106B |
G64H
|
10/07/03 | 13/07/03 | seed formed | 18/10/03 |
| 52 | 16/7/3 | G47B
|
G55A |
18/07/03 | 20/07/03 | too early | 29/10/03 |
| 53 | 22/07/03 | G49I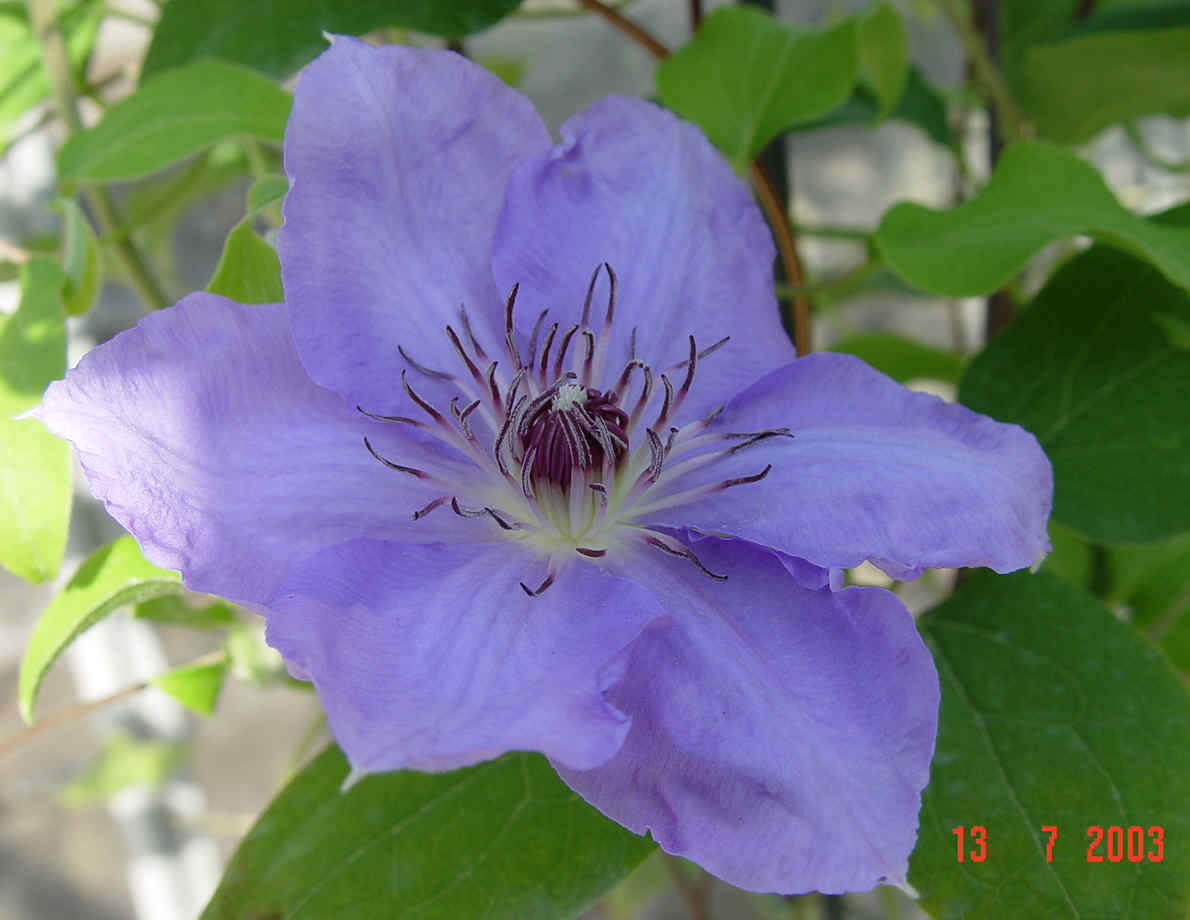 |
59a/55a |
25/07/03 | 28/07/030 | 18/10/03 | |
| 54 | 23/07/03 | G98B | G111 | 26/07/03 | 28/07/03 | ||
| 55 | 25/07/03 | G65D |
G76I |
28/07/03 | 31/07/03 | 02/11/03 | |
| 56 | 26/07/03 | G47K | G76I | 28/07/03 | 31/07/03 |
Some remain to be harvested yet, at 01/11/03
Key to plants involved:
|
Plant no. |
Comments |
|
Used as Seed Parent |
|
|
56 |
C. florida - plant vine died 30/06/03 out of the blue. All hybridisations lost. |
|
G67 |
C. new large-flowered hybrid purple |
|
168 |
C. integrifolia var. latifolia |
| Diana | C. texensis 'Princess Diana' |
| G47B | new C. large-flowered hybrid white |
| G95B | new C. large-flowered hybrid lavender |
| G66B |
new C. large-flowered hybrid = double white patens = Ruri/Vuru Okashi |
| G96 | new C. large-flowered hybrid blue |
| G106B | new C. florida seedling, previously unflowered |
| G49I | new large-flowered hybrid |
| G65D | new large-flowered hybrid |
|
Used as pollinator |
|
| G55A | C. texensis |
| G52B | C. viornae group |
| G61B | C. viornae group |
| G76I | C. viornae group |
| G97A | C. viornae group |
| 176 | C. coactilis |
| G58 | C. viornae group |
| G99 | new C. viticella hybrid |
| G84B | C. viornae group |
| 168 | C. integrifolia var. latifolia |
| G64H | C. viornae group |
| JB4 | Seedling Number 4 of Joan Baker |
| G62B | C. viornae group |
At 21/07/03 - The main aim for this year was to have been "to cross the species C. florida with a wide range of viornae-group species and hybrids individuals' pollens". The original plans had to be hurriedly modified, as, of the total of 52 crosses made, 15 C. florida (as seed parent) crosses were lost due to the sudden overnight death of the parent plant; so the remainder is 37 crosses. Of these 37, 14 have failed; however 16 appear good, and are now developing seed, with the remaining seven either developing small seed numbers, or being too early as yet to judge whether fertilisation has occurred. All crosses stirps opposita x stirps opposita.
Summary so far:
C. florida main plant unaccountably died the week after the final crosses, total of 15, a lot of work, were completed. However, a new C. florida seedling became available same week, so fortunately its been possible to duplicate one or two crosses, later in the month .
The main second seed parent plant is a new lfh very similar IN FLOWER to cultivar C. "Burma Star" = G67 for photo see 2002 new flowers page. The other lfh parents are all posted either now or shortly on the 2003 new flowers page.
The pollen providers can mostly be seen on the Archive 2003 page. They are a batch of C. viorna and viorna derivatives; C. texensis species and hybrids; C. crispa hybrids; C. coactilis species; other viornae hybrids etc - a range of variously coloured and sized urns, grown from seed.
The hybridisation sequences were photographed and the images and commentary are above.
 seeds forming on new (blue) large-flowered hybrid x new viornae-derived
seedling
seeds forming on new (blue) large-flowered hybrid x new viornae-derived
seedling
 new double-white patens x viorna-derivative; and same plant x
new large-blue viornae-group hybrid.
new double-white patens x viorna-derivative; and same plant x
new large-blue viornae-group hybrid.
Hybridisation attempts - Data, Year 2000
Below is some information pertaining to recent attempts at crossing Large Flowered Hybrids with various species plants. Although these crosses are "LFH x species" the method is identical when crossing "LFH x LFH" plants. This is because the emasculation and aftercare relate to the LFH seed-parent flower in both cases; the second flower only provides the pollen, be it species or LFH. When crossings are done, it might be helpful to know, the "female" parent - the plant on which the seeds are created and nurtured, is known as the "seed parent". The other plant is known as the "pollen parent".
Results for hybridising attempts in Summer 2000
Emasc |
Seed |
Poll. date |
Pollen |
Uncover |
Results |
Further Results |
|
1 |
24/05/00 |
Joan Picton |
28/05/00 | texensis |
01/06/00 |
Harvest 29/9/00 |
|
2 |
24/05/00 |
Joan Picton |
28/05/00 | texensis |
01/06/00 |
Harvest 23/8/0 |
|
3 |
24/05/00 |
Joan Picton |
28/05/00 | texensis |
01/06/00 |
Harvest 19/ 9/0 |
|
4 |
08/06/00 |
MBois'lot | 10/06/00 | texensis |
15/06/00 |
Harvest 29/9/00 |
5 |
14/06/00 |
Charissima |
17/06/00 |
texensis |
21/06/00 |
Failed |
|
6 |
14/06/00 |
Charissima |
17/06/00 |
texensis |
21/06/00 |
Failed |
|
7 |
14/06/00 |
Rcardinal |
17/06/00 |
texensis |
21/06/00 |
Failed |
|
8 |
28/06/00 |
Rcardinal |
03/07/00 |
texensis |
10/07/00 |
Failed |
|
9 |
28/06/00 |
Prince Charles |
03/07/00 |
texensis |
10/07/00 |
Harvest 23/9/00 |
|
10 |
28/06/00 |
SnowQueen |
03/07/00 |
texensis |
10/07/00 |
Forming seed | Harvest 25/10/00 |
11 |
03/07/00 |
RCardinal |
07/07/00 |
addisonii27 |
10/07/00 |
dubious |
Failed |
12 |
03/07/00 |
SnowQueen |
07/07/00 |
crispa 86 |
10/07/00 |
Forming seed |
Failed |
13 |
10/07/00 |
SnowQueen |
17/07/00 |
crispa 29 |
21/07/00 |
Forming seed | Failed |
14 |
10/07/00 |
Mrs N Thom |
17/07/00 |
crispa 29 |
21/07/00 |
Forming seed |
seed fine 4/10 Harvest 18/10 |
15 |
17/07/00 |
SnowQueen |
21/07/00 |
fusca blue |
29/07/00 |
Partial Harvest 29/9/00 |
Harvest 14/10 |
16 |
17/07/00 |
SnowQueen |
21/07/00 |
fusca blue |
29/07/00 |
Harvest 4/10/00 | |
17 |
17/07/00 |
SnowQueen |
21/07/00 |
fusca 123 |
29/07/00 |
Seed forming |
Partial Harvest 10/10 H2 18/10 |
18 |
17/07/00 |
R Cardinal |
24/07/00 |
crispa 29 |
29/07/00 |
Seed ok | Harvest 18/10 |
19 |
17/07/00 |
Vostok | 24/07/00 |
crispa 29 |
29/07/00 |
Failed |
|
20 |
17/07/00 |
Vostok |
24/07/00 |
crispa 29 |
29/07/00 |
Failed |
|
21 |
17/07/00 |
The Presid't |
24/07/00 |
crispa 29 |
29/07/00 |
Part Harvest 29/9 | Further harvest 4/10 |
22 |
17/07/00 |
The Presid't |
24/07/00 |
crispa 29 |
29/07/00 |
Partial Hrvst 29/9 |
Further Harvest 10/10 |
23 |
17/07/00 |
The Presid't |
24/07/00 |
crispa 29 |
29/07/00 |
Seed forming |
Partial harvest 4/10 |
24 |
04/08/00 |
Lady C. Nev |
09/08/00 |
texensis |
15/08/00 |
Seed forming |
Harvest 18+25/10 |
25 |
04/08/00 |
Lady C. Nev |
09/08/00 |
addisonii plant 86 | 15/08/00 |
Seed forming |
Harvest 4/12/00, at last |
26 |
04/08/00 |
SnowQueen |
09/08/00 |
pitcherii28 |
15/08/00 |
Seed forming |
Failed |
27 |
04/08/00 |
Elsa Späeth |
09/08/00 |
fusca 123 |
15/08/00 |
Seed forming |
Harvest 25/10 |
If you get it wrong you try to get it right next time.
Summary:
| Attempts | Fails | Fail % |
"Successes" |
"Success" % |
| 27 | 10 | 37 | 17 | 63 |
All above seeds sowed 01/01/2001. Germinations started in Nov.2001
So, decide in advance to do some crosses, then go ahead and get them done, so there's maximum seed-development time. You can vary things a bit in year two, once you've had a bit more practice.
All of which brings us back to square one; germinating seed and raising seedlings!
Links around the site:
End of page.