Overview
A brief overview of the main aspects of growing Clematis from Seed.
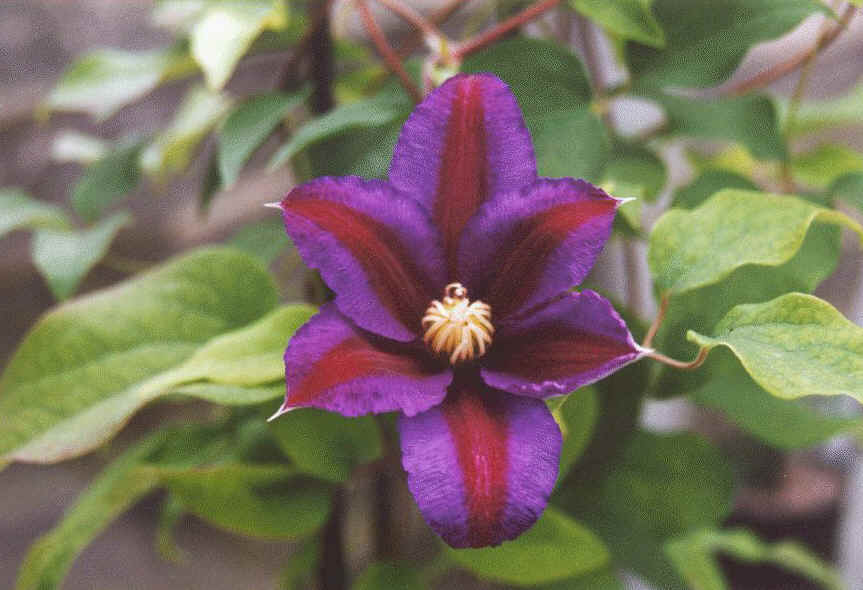
Seedling G73A first flower beckons. Click image to enlarge
The basic cycle from germination to flowering
This is a brief overview of the main aspects of growing clematis from seed: each stage is covered in more detail on the respective page. You can browse each page by clicking the appropriate link at the top menu.
****
The appropriate books show that the clematis family is very large, and diverse in many aspects: however, to the seed grower, that's no inhibition, because the seeds of all clematis happen to fall into more-or-less three general groups:
3 Types of clematis seeds; those which germinate fairly quickly, those that take some more time, And Intermediates.
Many clematis species, and virtually all large-flowered hybrid seeds, will take some time to germinate. Therefore, you must expect a “lead-time” between when you sow, and when you expect your first germinations. Even for the "more difficult" seed, as long as you plan right, you are 50% there. Most of these types of clematis arise from, and then, later, produce, larger seeds, with thicker outer seed walls, built to withstand a period of waiting - dormancy. The key to germinating seeds comes down to giving the seeds the right conditions ---- and, in those cases that need it, the necessary length of time. See the notes on the germination page for some suggestions to help in this regard. It is useful to check the germination data table to get an idea of what to expect, and what you might want to sow.
However, there
are many types of clematis seed which will germinate much more quickly, for
example, C. serratifolia, a magnificent plant which will germinate, grow and
flower usually all within the first season, going on to develop into a fine and
floriferous plant in subsequent years, even for the first-time raiser.
Another example is C. tangutica - in fact, many of the “orientalis” (meclatis)
group and their cultivars (mostly smaller, yellow flowers) will germinate, and
grow-on, quickly. Many of the “atragene” group – the alpinas and macropetalas,
and others, produce seed which also will germinate fairly easily and quickly.
Most of these plants produce much smaller, thinner-walled seeds, which are not
meant to withstand long periods of dormancy. See the
germination data table.
Ideally, you
could be growing serratifolias, tanguticas and others, even whilst awaiting the
first germinations of your large-flowered hybrid seeds, or species seeds such as
C. texensis, C. viticella, C. fusca, C. viorna etc.
Overview of day-to-day, general matters
Let's say that you happen to be at the stage where your seeds are sowed and you are awaiting your first germinations....
Once sowed, you can check your seeds once per week, preferably on a Saturday morning, when you're not thinking about work! You'll have periods when nothing happens, and other times when you will need to increase the frequency of checking, because germinations are happening rapidly. You'll be aware that some seeds are likely to germinate sooner than others, depending on the type of seed sowed; therefore you will check these seeds from week one, whereas you may leave seeds that take longer to germinate for a while, before you start checking. See the germination data table, to get an idea of what to expect.

C. napaulensis greets the World
Personally (only) I sow into 4" pots, and enclose each pot in a top-sealing plastic bag, after watering with a weak fungicide, and labeling. I find that the top-seal bags just maintain the moisture level, not too wet or dry, for long periods. But the pots don't get stifled.
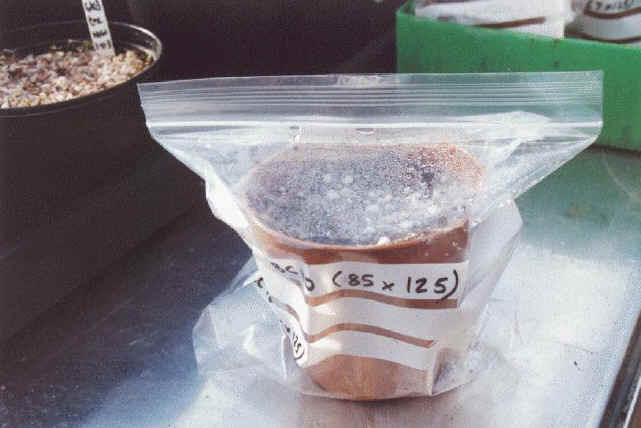
To make
handling numbers of pots easy, store them in trays. Shield the trays of pots
from the sun. I find its relatively unusual that fungal infection occurs, but
you'd be wise to keep a choice of fungicides handy. Do keep an effective
insecticide (keep two different types if possible); if you can, keep
insecticidal smoke cones, too, for monthly use; for raising plants from seed
these items are fundamentals. You will definitely need them (especially
the insecticide, in Summer) from time-to-time.
Most clematis books only give limited details of what to expect, when
germination occurs. Its a case of, you teach yourself how by doing it.
For Large-flowered hybrid plants (LFH)
plants; top each pot with a layer of fine gravel before putting in the bag. It
makes everything neat and tidy and can help prevent some fungal and other
problems. If you lift the pot to the light, any germinations are visible through
the soft, clear plastic; nowadays the bags don't degrade into mistiness as they
used-to. You might have to tap the condensation down, if any. You get a knack
for spotting germinations, even if at first you miss a few due to not knowing
what to expect. It usually doesn't matter if you miss a germination for a while,
not much will happen in a week.
I usually sow
most LFH seeds towards the Autumn, because I like them to get the first
available Winter's chill. I find I get better germination that way.
I find I get most germinations (of LFH seed) after the winter cold has well set
in; some even during Christmas and New Year, then a further rush into and beyond
Spring. Then sporadically after that. But that's only under my conditions, and
not meant to be a generalisation. (Note there are no hard and fast rules; 27th
September 2000; two germinations of C. florida.)
I no longer worry about Winter frost, too much, if that's when they germinate.
If you can protect germinations and seedlings from the worst of it, fine, a
little heating is very helpful. I store my pots both in a cold greenhouse, under
the staging, covered with fleece; and also outside, exposed to the elements,
awaiting germination. When the seedlings appear, if it's particularly cold
outside I may bring some into the house (softie). But by and large the seedlings
will come through a bit of frost ok. Of course you can decide to prevent frost
if you wish to, by various heating means. Again, this is only as pertaining to
my location, in Manchester, England, where we have relatively mild winters -
usually, but not always! (As seems the trend in recent years, this Autumn, 2000,
has been extremely wet in the UK; and very mild, so far).
Once seedlings begin to appear I check, over a period, to see just how many are
coming, and also how quickly they're coming through. Usually I re-pot the number
I require into small pots (photo) as
soon as I can handle the seedlings; any seeds left, together with any seeds
only just beginning to germinate, I put back in the pot, water-in, and return
whence. (Disturbing, at this stage, any seeds which are really only just
starting to germinate can be fatal to them, its true; so don't re-pot until
you've got the minimum number you want from that batch, at the right growth
stage. You might sometimes want as many as possible, you might othertimes
not need so many. It depends what they are. The number of plants you can
eventually handle is dependent on the time you can make available.
I add the letter "R" for "remainder", before the original germination-number, on
the existing label. Then if further germinations do appear later, I can if I
wish add the new seedlings to the existing sequence, knowing which batch they've
come from.
The seedlings can easily be differentiated from weeds because of their
appearance; in clematis, often, though not always, they appear from the soil or gravel as a thin shoot about
half-to-one centimetre long. The "spike" then unfurls and the first (seed)
leaves are visible. Depending on conditions the spike may hold its form,
sometimes for considerable periods of time, especially if it's cold out - don't
worry too much; or progress on to the first sets of leaves. I've even had
seedlings apparently die, only to reappear when things warm up a bit. (Clematis
seedlings are much more resilient than they may appear). Or, you
may notice two leaves being pushed up through the soil surface; over the next
day or so the leaf stems elongate and lift the leaves above the soil. The leaves
then unfurl completely.
All this is expanded upon on the Growth page.
Whilst all this is happening try to keep everything as clean as you can. Don't
let clutter or plant debris, loose soil - detritus - accumulate. Clean out
under trays or pots from time-to-time. If using pots, put them in trays to make
handling numbers of pots that much easier. You must maintain hygiene as best you
can where seedlings are concerned; I know its a general rule, but its
fundamental. You don't want to lose seedlings to "damping-off" or anything
one might possibly avoid, it's a waste of effort and waiting-time. When moving
plants, or checking your seeds and plants, make it a habit to clear up, as well,
as part of the process.
Allow a seedling to make three or four pairs of good leaves, then re-pot
into small individual pots. Once the seedling has clearly re-established, and
begun to grow on, you can prune it with clean, sharp scissors or pruners.
(Further early-pruning information on the Growth page.)
Maintain
moisture but don't waterlog. Some seedlings are shorter and stockier, and some,
more leggy and spindly. A while after pruning, either one or both of the buds
towards the lower nodes will break out, producing a new stem or stems. You can
experiment with how low to prune. At first you might worry about being too
harsh, but clematis seedlings are really tough, and don't mind the pruning. The
root continues to grow, uninterrupted as far as I can ascertain, and then the
top-growth comes back with vigour, stronger than you might expect, in most
cases.
In due course, further pruning forces new buds to break, low down, subject to
how you want the plant to progress; in most cases you want to achieve a
multi-stemmed plant with a strong root (but you can read all about that in the
gardening books); or you can allow the vines to grow, if you wish to try to get
the earliest first flower.
Once you've got to the point where you have two or three decent stems you can begin staking the plants, for support. Lots more detail about that on the Growth page.
If you are
raising a first few plants its feasible to manage, mind, mollycoddle and train
etc until flowering; you can vary your pruning to help manage slightly larger
numbers of plants.
The time spent in looking after seedlings is in proportion to the number of
seedlings; this is not quite as true later, when you get things into a better
routine.
I'm sure the professional breeders don't work in quite such a simplified
fashion!
I'd suggest
starting off with modest numbers of germinations, and seeing the season through,
setting further seeds later, for the next respective year. See how much
attention is needed - KEEP RECORDS - then (try!) decide on a maximum number of
plants for the following season, bearing in mind the first batch will still
require your attention. Don't sow thousands of seeds, nothing might happen at
first...but I guarantee, Year 2 will be mighty busy!
So keep it simple, and relatively limited, and, before anything, obtain the
B.C.S. factsheet, "Growing clematis from seed". Also, visit the I.Cl.S and B.C.S.
web-pages about growing from seed. Both are full of helpful and practical
information.
Remember, by the time you've got seedlings past the germination and initial
pruning-down stages, you've already overcome most of the potential hurdles,
before you see your first flowers, and they will be very well worth waiting for!
One day you are planting the vines, the next day you are sipping the wine!
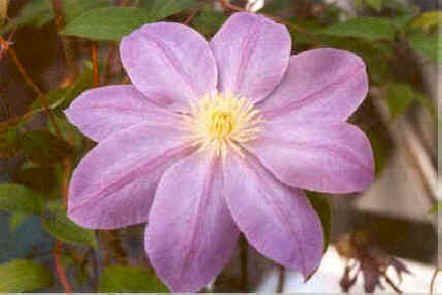
Above
image: P111-2000 second year flower, May 2000. Also see same plant from last
year, P111-1999, on LFH page.
See the Growth page for further details on progressing from germination, to seedlings, to first flowers. There are some further brief notes about raising young plants from the seedling stage onwards, over on the LFH pages. There are pictures of all stages on the Growth Gallery page.
DATA on the germination
characteristics of various clematis seeds is in the table on the
Germination page.
Time and space are limited (no Einstein arguments please, I mean my web site
only), so only brief details of some seed-raised large-flowered hybrid plants
follow - firstly (Year 2000 new plants) on the LFH 2000
page. The Year 2001,
Year 2002, and
Year 2003 pages etc follow.
All of which brings us full circle; to germinating seed and raising seedlings!